
After completing the Hozu river diorama and showing photos to people, I got back some very good comments that led me to think about making a gift shop sized model of a large Hozugawa kudari boat, or downriver boat. These boats are fiberglass now, but they are based on a wooden boat that the river tour company commissioned many years back by the last boat builder of the region.

My Hozu river diorama
Douglas Brooks was kind enough to share a drawing of the boat that he obtained in Japan. I worked out the measurements, and the boat comes out to about 33 feet in length. Figuring a nice sized desktop model should be no more than about 10 or 11 inches long, that would put it at about 1/40 scale. That’s actually not that miniature, but for a boat of this type, it’s certainly miniature enough. Plus, it’s large enough scale to allow me to show some planking detail and maybe forgo the fastenings detail.
A modern fiberglass (FRP) version of the Hozugawa kudari boat.
The shiki, or floor of the boat, was an interesting challenge. Few planks are alike, and the plank layout is asymmetrical. Planks are tapered in the forward half, and straight in the aft half. In addition, there is a mix of simple joints, scarf joints, and I believe what one would call a hook joint in the center.
I did my best to imitate the drawing I had, but I expect a traditional boat builder would not have a set pattern of joints, but probably have made the best use of materials on hand. There is nobody to give a definitive answer anymore, at least not that I’m aware of.
The last of these wooden downriver boats was on the water in 1977. The tour boat company that still operates on the Hozu river had a new wooden kudari boat commissioned that took to the water in 2009 – the first of its kind built in 60 years. However, the plank structure shown in the drawings I have appear to be a little different. It’s hard to tell looking at the shiki, but the tana, or hull planks are definitely different. I had to go with something, so I just stuck with the drawings.

Completed bottom of my Hozugawa kudari boat
Following methods I’ve used, more or less successfully, with other wasen models, I built a hull former using the side profile drawing to shape the central piece. Measurements and cross-section drawings gave me the shape of the hull at a few points along the hull. In most cases only two are needed.
I still haven’t figured out the best way to hold the parts to the former aside from simple clamps and rubber bands. This model is small enough that these worked okay.

I brought my Hozugawa kudari boat to the local ship model club meeting along with my Tenma-zukuri chabune. The kudari boat is shown with the hull former clamped into place. Note the todate, or transom, and omote no tate ita, or bow plank, are in place.
The trickiest part of the hull planks was that there is a scarf joint in the middle and lower planking strakes. The middle plank is easy enough to deal with, but when there is a scarf joint in a plank at an edge, where the exact width of the plank may not be fully know, that is fairly tricky.
To get the lower scarf joints located correctly, I had to use a wide garboard plank, or nedana. But, I didn’t know how wide. The only way to get placement correctly was to make a pattern for the whole side. The upper portion of the hull would get its final shape later, but the bottom edge was most critical.
A simple piece of card stock was taped into place and the bottom of the hull served as a guide to draw a pencil line on the paper. With this, and the upper edge roughly marked out, I could determine where the lower plank needed to fit. This would allow me to figure out the exact shape for a scarf joint to fit fully into place.
I went through this whole process rather quickly, so unfortunately I have no photos. I hadn’t really intended to document the process for this build. I may do something more complete for a future model, though.

Completed hull, before all the details are added.
Planks on a boat like this are easy to bend. When working with hinoki or Port Orford cedar, this is especially true, since the wood requires only dampening it in order to make it more pliable.
 You may note that the earlier photos showed a hull that looks darker than some of these. Partly, that’s due to color adjustments made to the photos. But, I also stopped dying the wood, leaving it its natural whitish tone. I had to do enough sanding at various stages that I sanded off much of the dyed layers of the wood and figured I’d take care of the coloring later, if necessary.
Much of the detail was taken from photos provided by Douglas Brooks of the last wooden Hozugawa kudari boat in existence. It is no longer used – now, 10 years after it was completed, and is sadly just left to rot. But, the boat did provide many details. I have included many of those details, but left out what I thought were more modern things. So, while there is a wooden rail for mounting benches across the hull, I didn’t not add a metal hand rail. I also didn’t add the many metal support bands that are found on the last wooden boat, in an attempt to recreate something from an earlier time. My idea was based on an old black & white photo I’d seen of a wooden kudari boat going down the Hozu River.


Now that I’m finishing up the model, I managed to find photos of this boat when it was first built. Turns out that some of the features I’m putting on my model were actually added later, when the boat was put into public operation as a tour boat. Specifically, mountings for the benches and the hand rails don’t appear in the boat when it was first built.
So, my model is something in between, or I either try to remove the bench supports or add handrails. I didn’t really want to add metal to this model. If I were to do that, I should add the other metal fittings too. So, I’ll probably just leave it alone.
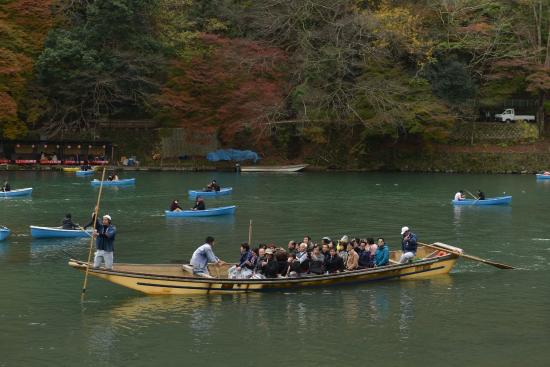
The actual boats are handled by a pair of paddle on the starboard side, a steering oar at the stern, and a boatman with a pole at the bow. I’m waiting to see if I can get some measurements of the actual items. If not, I can pretty well guess on the lengths and shape them according to photos.

I’ll probably mount this model on a simple block mounted on a cherry base, possibly just using double-stick tape to keep it from falling off the block.
This was a relatively quick build, once I figured out how it should go together. I’m going to see if I can make a couple more based on this model as gifts. Ω

Pingback: Hozugawa Kudari Bune in 1/40 scale | Wasen Mokei 和船模型