
Work is coming along on this model of the Edo period whaleboat-style craft Senzanmaru. Unfortunately, at this stage, a lot of work can be done with little apparent change in the model.
In the photos below, you can see how I taped a string at the bow and stern to service as a center reference line, so I can check to make sure everything is straight and even. I don’t know why I picked a tan line instead of a black one. I think the spool of tan line just happened to be handier.

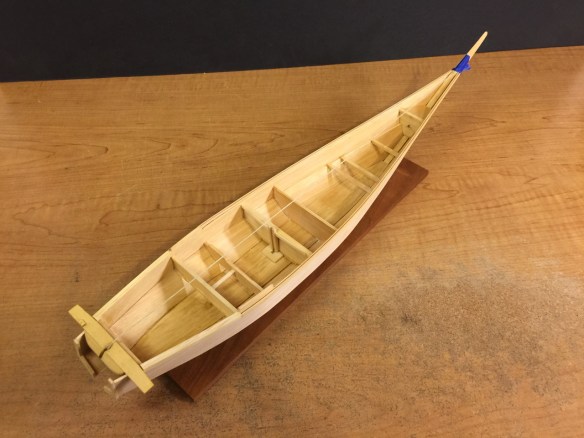
As I mentioned, progress is being made, but it’s basically all in the details now. You may have already noticed the ōtoko, the heavy beam at the stern. This serves as the rudder mount and hinge, and has a rogui (hinge pin and resting pad) on the left or port side for mounting a sculling oar. This boat was set up for up to five sculling oars, with the rogui mounted on the ends of two beam that I have yet to add.
You may also notice that I’ve added the boat’s mast step and mast support. There are also a number of beams and bulkhead sections added, as well as some various other internal details.

At the bow, it took me a little while to interpret the photos in the book and understand just what was going on here. Now it seems rather obvious. A small beam has a board that butts up against it and forms a downward sloping roof of a small compartement behind the miyoshi or stem. The rear panel of this compartment is removable, and there is a small ringbolt in it, to ease the removal of the panel.
There is a rectangular recess cut into this panel under the ringbolt, and this longitudinal stringer slide up into it. This stringer has a strip running down its center, which is used to separate deck board, which will be added later. On either side of the stringer are fixed strips that create a channel for the stringer to fit into. It seems that the stringer is removable and has to be, in order to remove the panel of the bow compartment. Note that I have no idea why the strips on either side of the stringer have different sizes.

At this time, most of the stringers are in place. This was a bit of a challenge to get them level and even. On the actual boat, the bulkheads and beam are notched so that these stringers lock into place where they’re supposed to fit. On my model, placing these pieces was an afterthought. But, at this scale and without really understanding the details completely, adding the stringers afterwards the way I did makes the most sense.

By the way, the compartment formed by the bulkheads just forward of the mast support appears to be a “live well”. On the real boat, there are thin slits cut into the hull here that would allow water to flow in and out of this compartment. Being a whaleboat-style craft, I had to wonder about this feature. I’ve seen live wells on other smaller boats, but I don’t see why they would be present on an actual whaleboat,
I think this just goes to show that this boat was not used for whaling, and perhaps the Hachisuka clan’s ranking members would use this boat for liesure fishing activities.

With all this internal detail, I am now wondering about how I want to display this model. All of these details will be hidden if I add all of the deck planks. But, it would then look as it should as an operational boat. Certainly, on a larger model, I would make all the deck planks removable, so that one could access the internal details. And, maybe that’s an upcoming project I’m going to have to take on. After all, working on this model has done a lot to teach me about how boats of this type were built. So, I’ll have the experience I’ll need in order to build a larger version.
As a last note for now, I’m starting to look at all the painting detail necessary to properly finish this boat, and at this scale, it seems rather daunting. One possibility is to leave the whole thing in its natural finish, making it more of an examination of the structure of the boat. But, once I start painting it, there will be no turning back.

Of course, there are some options to painting the hull. I have some color images in the Senzanmaru book that, if I can scan, I might be able to create decals, rather than try to hand paint the fine details.
I can hold off dealing with the finish for a little while, but already there are things I can not fix into place, such as the ōtoko, until I start painting, or until I deciding not to.
