
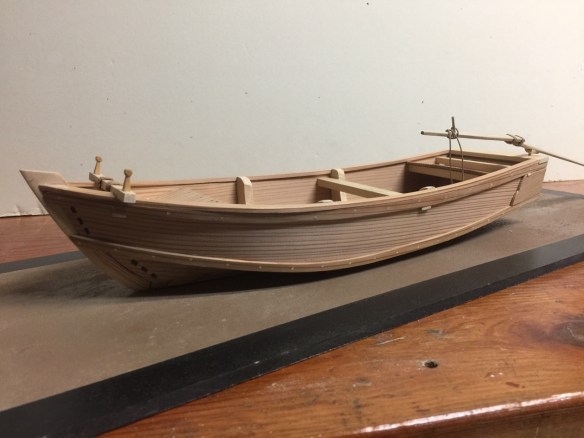
One of the features of this model is something that appears on many Japanese wooden boats, and dealing with it has been on my mind since this project began. I’m talking about the mooring bits, called the kanzashi. On this boat, they are tapered square posts with a faceted knob at the end.
On the real boat, these were made of honiki, but for a 1/10 scale model, I decided to use a harder wood that I have on hand, some Castello boxwood, which I use in ship modeling all the time, as there is no grain, has a nice tan color, and carves beautifully.
As it turned out, these were pretty easy to make. So much so that I made a pair and decided they were too short and quickly made another pair.

These were large enough that, rather than trying to carve a post to fix them into the mooring beam, I drilled them out and inserted very small birch dowels. These then fit easily and securely into holes drilled into the mooring beam.
The final stage was to lash the mooring beam down to the bow beam directly underneath it. This I did using some excess rigging line from a completed Woody Joe kit. I took about 6 turns around the beams and then wrapped around the waist of the lashing and tied off. I then secured the knot with a little glue and trimmed off the excess line. This holds the mooring beam very securely.

In the above photo, you can catch a glimpse of the next item that I’ll talk about, the ro, or sculling oar. The oar is made from a different material from that used to build a boat. I like the oar that came with the Tosa Wasen kit that I got from Thermal Studio in Japan. In that kit, the ro was made of hou wood (also called hounoki), or Japanese magnolia. It’s a grayish tan wood, so it adds a slightly color accent to the model.
While I don’t have any supply of hou, but I happen to have an old drumstick from my taiko playing days – yes, I played the big Japanese drums for about 10 years. So, I put the drumstick, called a bachi in Japanese, to one last good use, immortalizing it in one of my wasen models.
For a pattern, I used one I’d gotten from the book Japanese Wooden Boatbuilding, by Douglas Brooks. There’s a nice drawing on page 127 of one that’s just the right size for my model.

I decide to add a key to lock the head of the oar to the long blade. I then glued the pieces together and then wrapped them together with two small rope lashings. The rope lashings may not be very accurate, as I don’t know how far back the history of this particular boat goes, and certainly since around the middle of the 20th century, these would have simply been bolted together.


This ro is the right size, but it’s really not the correct style. It’s probably more reflective of the Tokyo boat builder’s style. The ones used on Toyama boats seem to be a little bulkier, more rugged looking. But, I think this ro will work for the model.
The last items to add to the model were the hayao, which is a loop of rope that attaches to the handle of the ro to help hold the ro in place, and the hayaoneko, which is wooden block attached to the inside of the hull for securing the hayao.
With that, the Himi Tenmasen model is complete.


The completed model was packed up and shipped to its new home on Saturday, and I learned today that it has safely arrived and will be going up on the new owner’s mantle.
Given that I now have two books on boats and boatbuilding of Toyama prefecture and direct contact with the curator of the Himi City Museum, I should really consider building another Toyama boat. There are a lot to choose from, so I’ll definitely be looking at possible future subject for some time. Ω
