
I took something of a break from the Kitamaebune project again while I tried developing techniques for making the Japanese-style sails. It’s held me up for quite a while, and I’ve actually started the process of sailmaking at least five times, never satisfied with the results. It’s partly a matter of coming up with a good idea, but it’s also a matter of my skill, or lack of skill, in making the idea work.
At the same time, I finished up a card model of a European medieval period ship called a cog. Like the Woody Joe Kitamaebune kit (and Higaki Kaisen too), it’s a 1/72-scale model that features, almost exclusively, laser cut parts. Cogs, like Japanese boats, also featured edge-fastened hull planking, and a single large mast with a square sail. If you’re interested, you can read about it on my shipmodeler blog.

Bremen Cog and Kitamaebune niswk comparison.
But, getting back to the Kitamaebune, it looks like what is going to look best, at least for my abilities, is to go back to the idea of sewing to simulate the outlines of the separate strips of cloth. I’m using a sewing machine for this work, like I did with the first sails I made.
The sail is again comprised of four large panels. This time, though, I thought I’d be more clever and use my Silhouette Cameo to mark the seams for me. The Cameo 3 that I have allows you to install a pen tool instead of a cutter, or both really, since the machine can accommodate two tools that can be selected by the design software.
My idea was to make a simple dotted line for me to follow when sewing. Doing the drawing on the computer assured that my lines were perfectly straight and parallel and had even separation. I used the kit provided sails to get the distance between lines, 0.421″. I then sewed a tight stitch along the lines. It was a lot more difficult to maintain perfectly straight stitching than I remember.
After all of this, I figured out that the use of the Terial Magic stiffened the cloth to the point where I think it was actually harder for me to sew straight, though it could still me my own lack of sewing skills. Also, because the cameo was sketching permanent lines in pen, I really had to sew much straighter that I was.
I decided it was safest to go back to older tried and true methods for this project. I still used the cameo sihouette, but simply to sketch dots near the top and bottom edge of the cloth. I will connect these dots with vertical pencil lines as a sewing guide. These can then be washed out after the sewing is done.
So, I marked two new pieces of cloth using the cameo, used a straight edge and pencil to draw my guide lines, and then I stitched along these guide lines with the sewing machine.

Now, the lines were much straighter her than in my past attempts, but as you can see I chose a lighter colored thread, so the stitching wasn’t as prominent. This looked pretty good, but I just felt it wasn’t accurate. The old Japanese sails had these panels connected by a pretty coarse straw rope, which was a darker color.
So, I went back and repeated the whole process AGAIN. I don’t think the effort was wasted, as it gave me more sewing practice, and I’m pretty pleased with most of the final stitching. Some lines are still off, but since I need to cut panels that are 6 strips wide, and I have two full pieces of sewn cloth, I can afford to weed out the occasional wandering stitching.
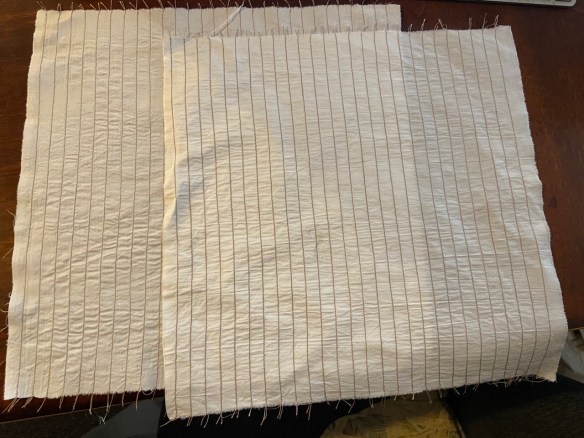
Okay, so these have GOT to be the last sails I’ll sew for this model! They look good, though one cloth developed a blemish that came up with the ironing. I’ll see if I can wash that out and re-dry it. If it’s still there, I’ll see if I can avoid it when I select the section that will for the final panels for my model.
I’m not quite done with machine sewing, however. There is actually one more continuous, horizontal seam that I need to sew about 7/8 of the way down the sail. In the kit, this has an arch to it that follows the arch of the foot of the sail. I realized that these are arched to give more of the illusion of a billowing sail – the real sails aren’t arched. But, although this arching isn’t exactly accurate, it’s visually effective at making the model look more like a real ship. So, I’ll look at doing something similar with this model.
One thing is that I plan on “scalloping” the bottom edge slightly, to give more of an illusion that the individual cloth strips are billowing and held back by these seams, much like in the photo from the Takasebune book I posted previously.
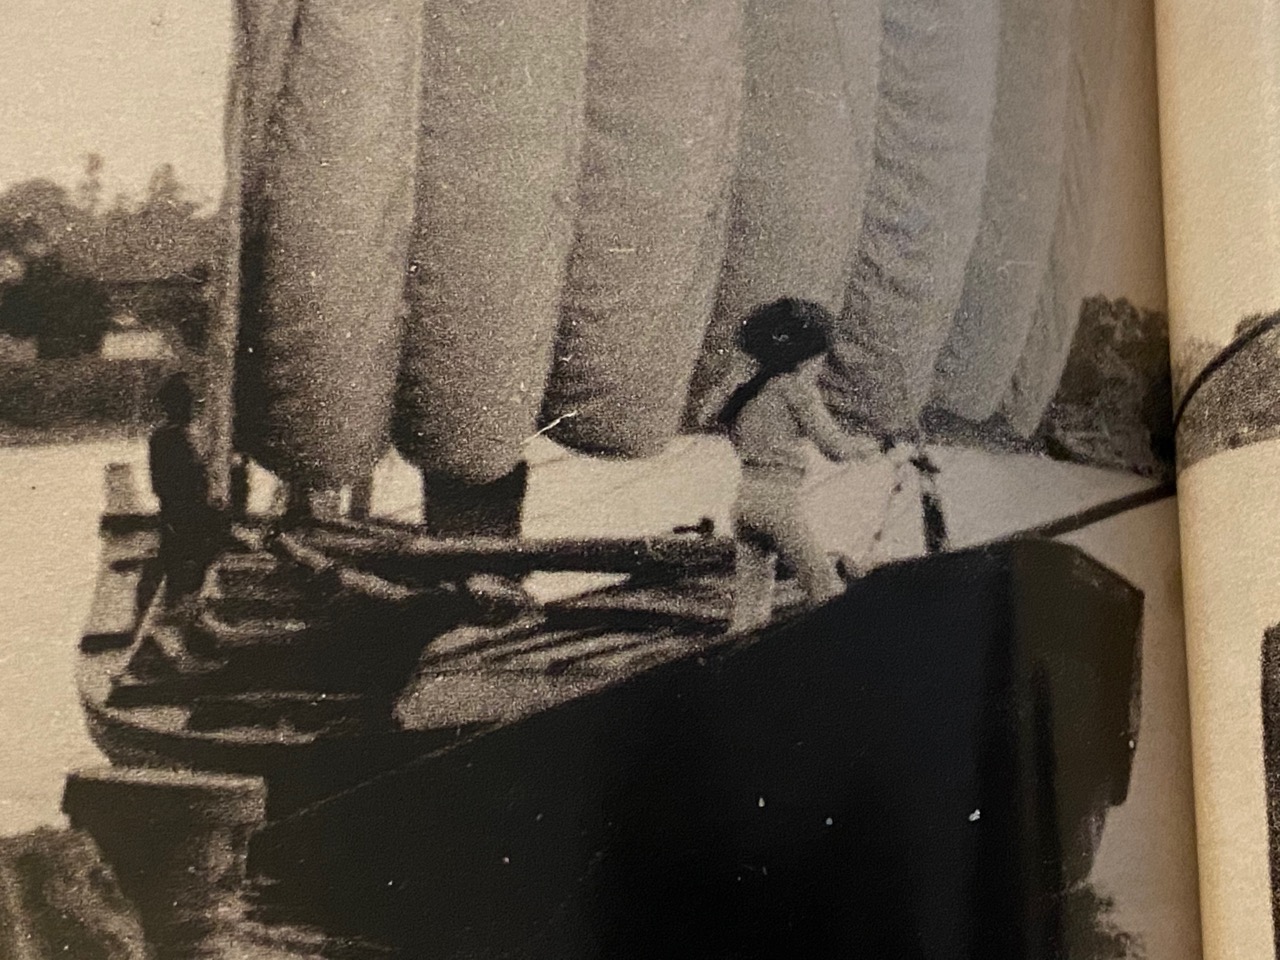
Photo from the book Tonegawa Takasebune no Hon (利根川高瀬船の本)
But, at this point, I need to pause and think about the order of tasks and give some thought to how I’m going to finish up the sail. I will need to fold over some of the edges, slightly scallop the bottom and do the reverse at the head of the sail. But, the edges will start to fray unless I use some kind of treatment.
Also, if I want to try to billow the sails at all, I might want to try to embed a little brass wire along some edges. This won’t really be possible along the bottom of the sail if I’m going to have the scalloping – there won’t be any fold-over to hide wire there.
Then, at what stage do I want to try to sew that horizontal stitch? If it’s just a straight line, then it do it right now. But, if I want to add a bit of an arch to it, then I might need to wait until I’ve selected and cut the four panels I’ll be using.
Okay, a little to think about, but I’ll try not to dwell on it too much. I want to make some progress now.

Pingback: Utasebune 打瀬船 Fishing Boat – 1/72 Scale Model from Paris Drawings – Part 1 | Wasen Mokei 和船模型