Building Woody Joe’s 1/72-scale Kitamaebune Kit – Part 12

I took something of a break from the Kitamaebune project again while I tried developing techniques for making the Japanese-style sails. It’s held me up for quite a while, and I’ve actually started the process of sailmaking at least five times, never satisfied with the results. It’s partly a matter of coming up with a good idea, but it’s also a matter of my skill, or lack of skill, in making the idea work.

At the same time, I finished up a card model of a European medieval period ship called a cog. Like the Woody Joe Kitamaebune kit (and Higaki Kaisen too), it’s a 1/72-scale model that features, almost exclusively, laser cut parts. Cogs, like Japanese boats, also featured edge-fastened hull planking, and a single large mast with a square sail. If you’re interested, you can read about it on my shipmodeler blog.

Bremen Cog and Kitamaebune niswk comparison.

Continue reading

Sailing into the Past – A Book of Replica Ships

Douglas Brooks’s article on bezaisen, also known as sengokubune, was one of my first references on these big Edo period coastal transports.

It’s a very good article and has some nice photos in it. The cover photo was provided by Professor Kon, who heads the Wasen Research Society at Kanagawa University.

Ship Modeler

For those of you who might be interested, I just noticed that US Naval Institute has a nice sale price on the book Sailing into the Past. This book includes an article on bezaisen by Douglas Brooks, and features a photo of the replica bezaisen (also known as a sengokubune, or more specifically a kitamaebune) Michinoku-Maru.

The book is a compilation of articles about various replica ships around the world today, and it probably a very good general read. Of course, given my work with Douglas Brooks, I would love for everyone who might be interested to buy a copy.

I don’t know what the regular price is for this 200+ page hardcover book, but it’s only $11.49 at USNI.org. To me, Douglas Brooks’ article is worth the price of the book. Check it out here: https://www.usni.org/press/books/sailing-past

I think it was originally $45.95. So this is a very good…

View original post 2 more words

A 3D CGI Model of a Sengokubune

One of my Japanese contacts just posted a web page on his Facebook account. The page allows you to view a virtual 3D model that you can spin around and zoom in on. It looks pretty complete, and should be a benefit to those attempting to build a model of one of these ships, generally called Bezaisen or Sengokubune.

The website is that of the Minamichita Museum, which is located in the town of Minamichita on Ise Bay, south of Nagoya, and across the bay from Ise and Toba. The website is viewable in either Japanese or english, and not only provides this CG viewer of a bezaisen, but below it, there are some excellent photos, animations, and descriptions of important features and items carried aboard the ship.

Some of these items, I have never seen before. Check them out, and make sure to click on the animations, as they tend to reveal more information as they play. This site gave me a little more insight into the details of the interior of the ship’s cabin, and now I’m beginning to think it would be interesting to build a detailed vignette of one.

I also learned a few other things I didn’t know about shipboard details. Check it out and see what you learn: http://minamichita-museum.com/wasen/en/ship.html

Also, make sure to go to the main page and follow all the interesting information and links about Utsumi-bune, historical documents, the section on History that Survives in Minamichita, the links on festival floats, and more. Ω

Higakikaisen/Tarukaisen Book( 菱垣廻船/樽廻船)- Tokyo Maritime Science Museum Download (Japanese)

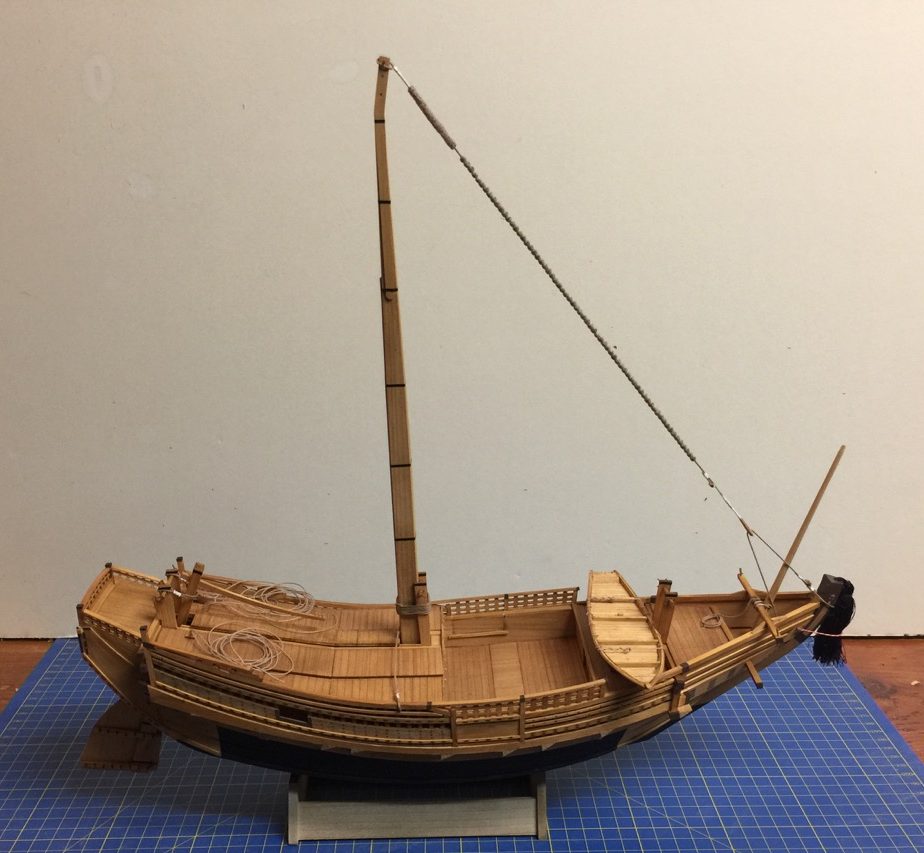
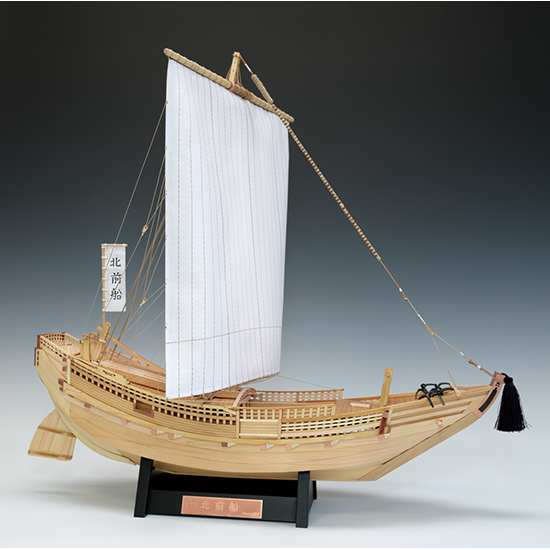
In past posts, I’m sure I’ve mentioned this illustrated small format booklet, printed in Japanese, on these Japanese coastal transports.

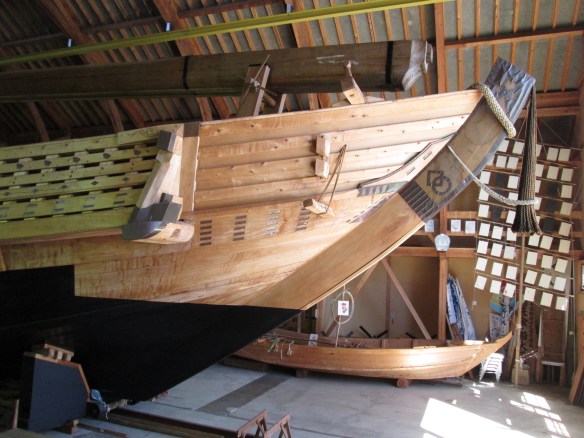
The ships, generically known by sailors as bezaisen, had specific terms based on their function. The Higakikaisen (菱垣廻船 were cargo transports belonging to a trade guild, and provided regular transport of cargo from Osaka to Edo in the 17th and 18th centuries. Tarukaisen (樽廻船) were barrel carrying transports that carried sake and soy sauce around the same time.

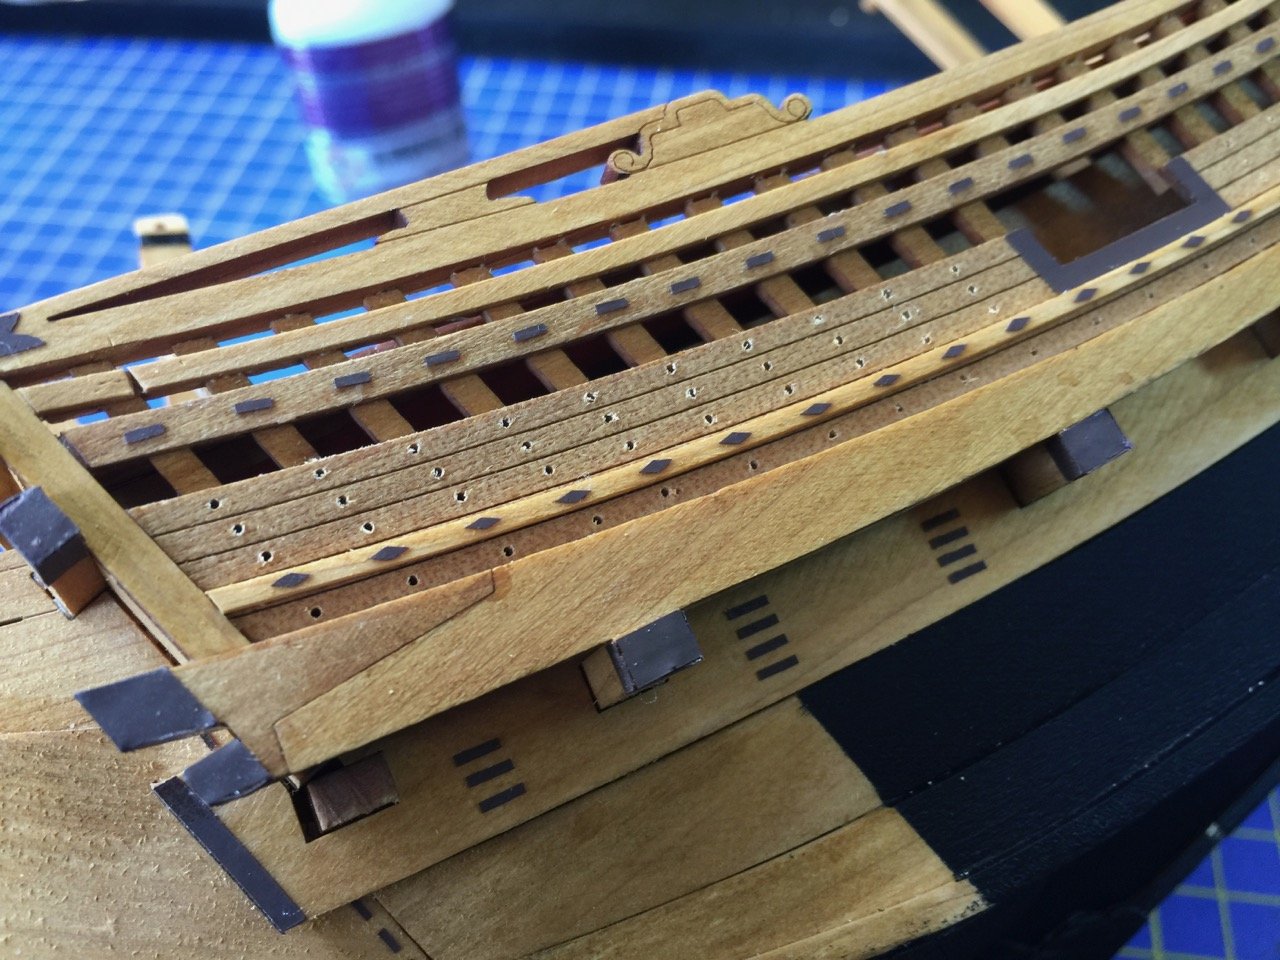
The book explains about these ships, their history, and design. I bought a copy last time I was in Japan, I think I was in the Toba Seafolk Museum gift shop where I found this and several other books I had to have. The price isn’t on the cover, but as I recall, it’s very inexpensive. Unfortunately, it’s very difficult to get unless you actually travel to Japan. And, even then, you have to know where to find it.

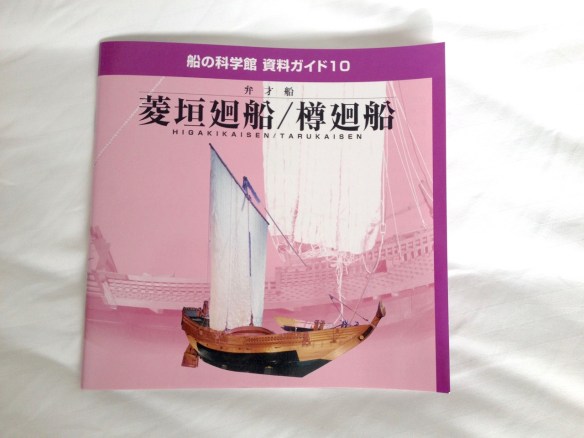
Recently, I received some information that the book is actually available as a free download from the Maritime Science Museum’s website. I checked it out and, sure enough, you can get this booklet for free in pdf form.

Here’s the link to the download: http://fields.canpan.info/report/download?id=3233

Again, the booklet is in Japanese. But, if you don’t read the language, you can print it out for yourself, look over the photos and diagrams, and use Google Translate to help you with small sections of the text – it’s hard to select large sections of text when it’s published in column format.

[EDIT]: The download is from the Nippon Foundation website. So, before you think I might be providing a link to an illegal copy, here’s the link to the Foundation’s download page for this book: http://fields.canpan.info/report/detail/4963. Just so everyone knows!


Ω

Building Woody Joe’s 1/72-scale Kitamaebune Kit – Part 11

Sailmaking is at somewhat of a standstill, as I’m experimenting with different techniques for representing the large sails of the kitamaebune in 1/72 scale. There are number of possible things I can try,, including simply stitching the seams as one might do for a western ship’s sails, but I’m still hoping I can show some of the characteristics of the Japanese sails.This is something of a long term process, so in the meantime, I decided to move ahead with some of the other model details.

One of my sail making attempts still being tested and considered.

It had occurred to me that might make the most sense to go ahead and build the various components of the main stay. It took me a while to figure out this is called the Hazuo in Japanese.

Dealing with the stay, or hazuo, requires making/rigging four different parts. Here’s the section of the instructions that deal with this.

Continue reading

Building Woody Joe’s 1/72-scale Kitamaebune Kit – Part 10

I’m now in the final stages of the building of Woody Joe’s Kitamaebune model kit. I’m working on the sails and rigging and dealing with a few small remaining details.

The kit sails are very nice, and have the sail seams and lacings printed on them. From a normal viewing distance, they look great, and I’ve gotten compliments from those who glanced at them and thought I’d stitched them. But, I’m going to need a main sail as well as one at the bow and I want them to match. The only way to do that is to make them both.

The big issue is that I’d love to be able to detail the Japanese-style sails, which are made of separate panels that are laced together. The design is such that the sails are effectively self-reefing, so that they spill the wind when it gusts. This design is more apparent on sails of smaller vessels, and I don’t know if the lacing between all of the panels are that way, or just between the four large groups of panels. But, you can see the idea in a pair of photos from ModelShipWorld member marcjp, who lives in Osaka, Japan, and took these photos of the museum ship Naniwa Maru.

Continue reading

Building Woody Joe’s 1/72-scale Kitamaebune Kit – Part 9

I’ve finally made significant progress, though most of it doesn’t really show, as so much is in the small details – the simulated copper coverings are finally done!

This took me a while as I kept thinking I was done. Then, I’d think some more and realize there was some other feature I wanted to add. I’d no sooner finish that, than realize I really should add yet another feature. This cycle has repeated itself many times, but I think it’s over now, and I can put that equipment away.

The next item I decided is pretty straight forward and related to the vinyl “coppering” details. Often times, the coastal transports, known generally as bezaisen, are shown with nail heads in the bulwarks fences. Adding these at this scale may be a mistake, but I’ve started down the road – No turning back now. I drilled out all the necessary holes which will be plugged with some 22 gauge copper wire. I intend to blacken the wire using liver of sulfur.

IMG_0429.jpg.45dcfb023d8948c8297a948bc7cae8f0.jpg

Holes were drilled out and I started the process of making copper “nails”. The heads have to be flat, so I filed the end of the wire and then cut the “nail” off.

IMG_0431.jpg.3dded1a03077b9d0da98bf12d01a0c32.jpg

Continue reading

Building Woody Joe’s 1/72-scale Kitamaebune Kit – Part 8

More and More Copper Details…

This project stalled a bit while I was adding the copper coverings detail, which I’ve actually been making using brown permanent adhesive vinyl that I laid out and cut using my Silhouette Cameo 3 machine. The slow down is simply due to the amount of small details I’ve been feeling I need to make.

As I’ve written earlier, I reproduced the kit-provided shiny copper pieces with vinyl ones using the Cameo’s feature called PixScan, which allows me to use a specially marked mat on which the parts are placed and to take a photo of the them. This gets imported into the Silhouette Studio software and I am able to recreate the parts from the photo.

Part of the process is automated, but it works much better for larger objects. The small parts in this kit require that I do a lot of editing to sharpen up and straighten up the cut lines.

Woody Joe product image of the completed Kitamaebune kit.

In addition to those parts, I’ve been studying my photos of the Hakusan Maru, the kitamaebune on Sado Island, to figure out what other copper plates I need to make. There are a LOT of copper coverings on these ships, so the project seemed a bit overwhelming. Each part had to be measured on the model, which does not correspond exactly to this particular ship, and drawn in the Silhouette Studio software. Then, the Cameo cutter was set up with a piece of the same brown colored vinyl on a light adhesive cutting mat, loaded up, cut, unloaded, vinyl removed from the mat, mat put away to keep it clean (more like keeping it from getting too dirty). Finally, the pieces are carefully applied to the model.

Stern of the Hakusan Maru on Sado Island showing all the copper plates and the iron work on the rudder.

Bow of the Hakusan Maru on Sado Island showing lots of small copper plates on the real ship.

Continue reading

Building Woody Joe’s 1/72-scale Kitamaebune Kit – Part 7

The Tenmasen

This Woody Joe kit does not include a tenmasen, which is the small ship’s boat used for transferring crew and cargo to and from the ship, but neither did their Higaki-kaisen kit. The tenmasen is normally carried across the deck, atop the kappa, which is the small forward cabin where ropes and sails are stored. They are used by the Higaki-kaisen as well as the Kitamaebune.

Image from a Tokyo Maritime Science Museum book on bezaisen such as the Higaki Kaisen and Kitamaebune. Note the tenmasen forward of the open main deck.

Up to now, all the tenmasen I’ve seen illustrated have been pretty heavily constructed boats, propelled using one or two ro, or sculling oars. In contrast, the tenmasen recorded in the Paris illustrations is very wide and flat, appears somewhat lightweight, with a shallow draft, and is equipped with a pair of sculling oars, as well as 10 paddles, which are used much like western-style oars.

Tenmasen reconstruction at the Hakusan-maru Museum on Sado Island.

Continue reading

Building Woody Joe’s 1/72-scale Kitamaebune Kit – Part 6

Details, Details…

Hull construction is done on the Kitamaebune, the rudder has been added, and it’s time to turn my attention to the small details.

The kit, like all of the larger Woody Joe wasen model kits, includes a sheet of photo-etched copper, which covers many of the beam ends and such. But, while these pieces cover all the major features, there are many more, smaller details on the real ships that aren’t dealt with in this or the Higaki Kaisen kit.

I took these photos of the Hakusanmaru on Sado Island in 2016. In them, you can see all the brown colored copper coverings as well as the black iron bands and fasteners.

I considered trying to make these details in copper, but it wouldn’t match the copper in the kit, which actually appears to be some kind of copper alloy, as it doesn’t tarnish like regular copper. The solution I came up with, was to use brown colored adhesive vinyl. So, it was time to re-introduce my vinyl cutting machine, the Cameo Silhouette 3.

Here’s a link to the blog post where I used the Cameo to make the ornamentation on my Kobaya model: https://wasenmodeler.wordpress.com/2019/05/27/building-a-gozabune-kobaya-from-paris-plans-part-13/

Continue reading