
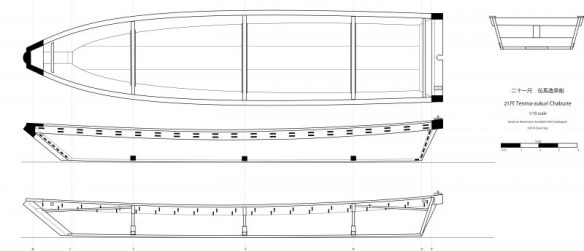
Construction of the model continues as I’ve been working out how I want to tackle some of the details on this 1/20-scale model. The major issues to deal with are the copper mortise covers and other copper detailing as well as the detailing of iron nails used to fasten the koberi, or rub rail, plus wire nails used to fasten the uwakoberi, or the caprails. Some of this is quite simple.

Below, I’ve posted a photo of Japanese modeler Kouichi Ohata’s Tenma-zukuri chabune. He has been helpful in the adjusting of the design of the drawings and has completed a model based on the drawings.
His model is built at 1/10 scale. I may eventually build one at this scale, but for now, I’m happy building mine in 1/20 scale, and I’m considering building other wasen of the Funakagami in 1/20 scale also. It saves on space!
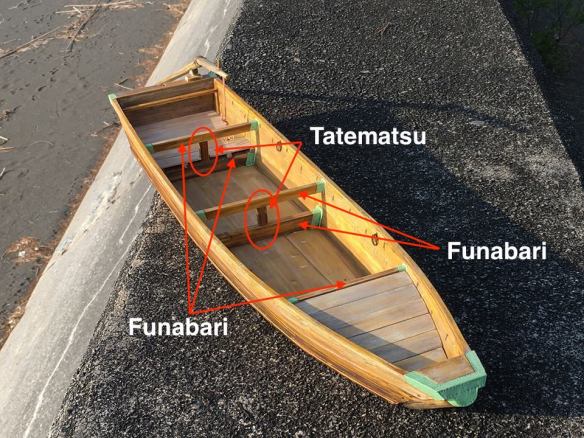
Photo of Japanese modeler Kouichi Ohata’s 1/10-scale Tenma-zukuri chabune based on my plans, with a few modifications and added details.
Tatematsu and Funabari
In the photo of his model, I circled the tatematsu in red. These are the vertical supports that connect the upper and lower funabari. Because there are no frames in these boats, it’s easy for the hull cross-section to end up a little asymmetrical, where the tana, or hull planks, might bow out more on one side than on the other. The funabari, together with the tatematsu, help to hold things in alignment.
On my own model, the center of the upper and lower funabari was located and rectangular holes were carefully cut to fit the tatematsu. The piece for the tatematsu was left long and trimmed and test fit repeatedly until the upper funabari restedly snugly back into place.
When all were done, I glued them into place and glued the funabari to the tana as well. I had started to notice that the hull was starting to warp slightly, so I had to wet some of the wood a little and twist things back to shape. On a full-sized boat, this would not have happened as the boat’s hull sits flat on the workshop floor. Building the model, however, entails some holding of the model in the lap, or just in the hands, in order to fit things, and that could, and did, throw things off just slightly.
Tsunatsuke
After the funabari came the addition of the two tsunatsuke, which are small beams near the ends of the hull. These were used to tie ropes to for mooring, towing, etc. Unlike the funabari, which are flush with the top of the hull planking, the tsunatsuke sit lower. This requires holes cut in the hull planking. The most difficult part of this is getting the holes located exactly across from each other.

My model with the forward tsunatsuke in place – ends not yet trimmed. Note the notch cut for the small platform at the bow. Also, the wood at the transom cut away for the ōtoko, or great beam.
The other trick is to make sure they’re position properly so that when the nails are positioned for the koberi, the beams won’t be in the way. I didn’t mention it earlier, but the larger funabari were also positioned with this consideration as well. I’m not sure about this, but I imagine that the real boat builders thought the other way around and positioned the beams where they were needed and worried about spacing the nails later.
While working on the tsunatsuke, I also made preparations for the addition of the large beam at the stern called the ōtoko, cutting away areas of the hull planks as well as lowering the top edge of the tomo, or transom. The latter step was a slight divergence from the way I drew this area in the plans. I did this for simplicity sake, as it didn’t require cutting a special shape in the ōtoko.
Mortises and Koberi
Next came the task of making the koberi and cutting all the nail mortises in it and in the hull planks. The mortises are regularly space and rectangular. On my drawings, I marked the mortises that are to be covered with copper plates as black rectangles. That is how they appear in the Funakagami print.
There are actually other mortises in the real hull, but I didn’t mark them on the drawings. They would be in the hull planks along the bottom. Perhaps I’ll add these to the drawings later. At the moment, I don’t plan on adding them to the model, but I’m thinking about it now. On the real boat, these would be filled with wooden plugs or simply filled with putty. They don’t appear on the Funakagami print as they wouldn’t be very noticeable.
Another Use for the Sihouette Cameo
In order to cut nice, regular rectangles, they need to be marked out clearly, cut, and chiseled out. On my model, since I had recently invested in a vinyl cutting machine, I ended up taking my drawings and copying the nail patterns to what is called an SVG file. This is one of the formats that Adobe Illustrator can output to. I could then import this into Silhouette Studio, the software that runs the cutter. However, I had to upgrade my Silhouette software to a higher-end version that could handle the import of the SVG format. The $50 cost for the upgrade seemed worth having this capability.
I had to experiment a little with imported file, but was able to cut a mask from adhesive back vinyl that I could lay into place on the wood. The open areas were the mortises, so I just cut along the edges of these openings.

I did this with all the mortises, though those at the miyoshi, stem, and the todate, transom, were thinner and shorter. This is adhesive backed vinyl, so I could simply stick it into place and work with it. A mirror version was made for the opposite side.
In the following photos, you can see that this seemed to work out well. The mortises in the koberi were actually cut they were attached.


Koberi shown in place with the ōtoko being prepared. Note that the mortises needed to clear the tsunatsuke, as well as the funabari, so some care had to be taken in placement.

Coppering
I’m still working on how I want to move forward with the coppering. I considered trying to see how well the Silhouette Cameo might handle copper foil. It’s not one of the listed materials, but it seems to me that it should work. I’ve done some preliminary testing and it will cut foil. The problem is mostly that I’m working with such small pieces that they come loose easily.
I also am experimenting with creating the dark patina on the copper, as the material as I receive it is bright and untarnished. The black appearance in the Funakagami prints and other woodblock prints appears to be a stylized way of representing the dark patina of the copper plates.
Now, I find it interesting that copper plates like these are seldom depicted with a green patina that we often expect to see on copper. I’ve seen this on modern wasen, but never really on images or photos of old ones. Were they treated in some way or possibly painted over? So far, nobody I’ve been in contact seems to think so. But, it does leave me questioning another aspect of Japanese boatbuilding in the Edo period.

Tenmasen build by Douglas Brooks and his teacher. Note the dark patina of the copper here.
Anyway, this is another thing to work on: To patina or not to patina? Also, how to do it. I’m looking into Liver of Sulfur and how it may affect the wood of the model. I’ll post more information as I figure out what I’m doing.
Before I have to worry about that, there is some more construction to do, which I’ll cover next time.
