Identifying a Japanese Boat from an Historical Photo

When studying wasen, particularly when you don’t live in Japan, about the only research you can do is either by studying books or using the Internet. In Japan, you can visit museums to find old boats, models, and photos, where some specialist has identified all the artfacts; You can travel out into the rural areas and maybe spot some old boats abandoned by a river; You might even be able to meet an old boat builder that can tell you a thing or two about the boats he worked with, though as time goes by, that option is quickly disappearing. But, outside Japan, you basically have books and the Internet.

I recently ran across this interesting photo on Flickr. There were a couple comments on it, but they were pretty old and didn’t really offer any information, just a couple observations.

The first thing noticeable in this photos is the cargo. Those are tawara, or rice bales, and they are pretty standard size at this point in time, anyway. Of course the exact time of the photo is hard to say for sure, but it’s a good quality hand-tinted photo, which was popular in Japan between the 1860 and 1900. And, there are some telegraph poles in the background.

In any case a rice bale is generally around 2.5 feet long. You can see two bales fitting end-to-end across the width of the boat in the foreground, giving us a width of 5 feet. Allowing for the hull planking and rail, say maybe 6 feet across.

The most important clue is the shape of the bow, and the run of the planks there. If you zoom in, you can just make out that the seams of the planks appear to be roughly parallel with the stem, or miyoshi. This is a style of bow planking that is unique to Lake Biwa.

Fortunately, I have a copy of the english language version of a book on marukobune, which is a well known boat type that sailed on Lake Biwa. Besides the marukobune, it has some small drawings and descriptions of many other types of boats in the Lake Biwa region.

I actually happened to already have an idea of what the boat in the photo was based on what it was carrying and the narrow canal it was on, so I knew what to look up. Sure enough, I found a boat type called a sosuibune, or canal boat.

Model in the Lake Biwa Museum.

The sosuibune were developed in the late 1800s, specifically to navigate the newly built canals that were constructed to carry fresh water and to provide a transportation link from Lake Biwa to the city of Kyōto. Sosuibune carried rice and firewook to Kyōto and apparently returned with finished good and material for kimonos.

The details on their size is a little bit limited in the marukobune book, but it does tell us that the boats were about 6-shaku wide, which is almost exactly 6 feet, and a depth of 2-shaku. From a very small drawing in the book, I was able to work out that the boats must have been about 35-shaku long. Again, that’s about 35 feet. The boats are described as having a carrying capacity of 30 koku, which apparently works out to 75 bales of rice.

As a model subject, it seems like a fairly simple boat, with the most interesting feature being the planked bow, which is called Heita style. This creates a more rounded bow, rather than the sharp pointed bow that is common to so many Japanese boats, and creates more interior capacity.

The only drawings are pretty fuzzy, and I’ve contacted the Lake Biwa Museum about finding other drawings, but they weren’t much help. However, the drawings in the book, with some careful image analysis and enhancement, should be able to result in a decent model. So, I may just make the attempt. Ω

Funabashi – Boat Bridges in the Edo Period (船橋)

The term Funabashi, is probably most recognized as a city immediately east of Tōkyō, in Chiba prefecture. But the name literally translates to boat bridge. This is a totally unknown subject to me – I never knew they even existed until a few days ago.

Photo of the funabashi near the mouth of the Jinzu river in Toyama prefecture.

While following Internet leads, as I often find myself doing, I ran across the text of a Japanese lecture that turned out to be by Mr. Naoki Hirose, who I know from his connection with Douglas Brooks’ work in Himi City, Toyama prefecture, and more recently from the Wasen Kenkyu Kai meetings that I’ve been attending recently via Zoom. He is the curator of the Himi City Museum. As I already know and communicate with Hirose san now and then, what a coincidence and discovery! The lecture was actually part of some kind of event focused on railroads, but this was an article that talked about how things and people traveled on the “boat highway”.

Continue reading

Building a Tenma-Zukuri Chabune (伝間造茶船) – Part 5 – Final

First off, my apologies for taking so long to post an update on this project. The Tenma-zukuri Chabune is actually done. It sat for a long time with all the construction work done, needing only the coppering detail. I finally got the nerve to get back to it and it is now finished. But, when I last posted, there was still work to do, so let me take a step back to go over what was done.

Last we left off, the nail mortises had been cut and I was ready to add the decks at the bow and stern, or the omote and the tomo.

I don’t know if the boards that make up these decks were removable. Underneath, I left the ends open, so things could be tucked in there for storage, but only for smaller things, as the support posts of the beams cut the openings in half. If the deck beams were removable, there should be finger holes in at least some of the deck boards, so they could be easily lifted up. Sometimes, there was also a V-shaped pattern inscribed across the boards to make it easier to identify which boards go where. This is less important at the bow, where the boards lengths vary greatly, making them more easily identifiable as to which one goes where.

At 1/20 scale, I decided to keep things simple and didn’t add either finger holes or the alignment inscription. This would be more important on a larger scale model, like 1/10 or 1/15. So, adding the deck boards was just a matter of laying them down.

Continue reading

Attending a Japanese Wasen Meeting on Zoom

Last night, I had a very rare opportunity to attend a meeting of the wasen study group that normally meets periodically at Kanagawa University. I’ve been wanting to attend a meeting for more than a year, but getting to Japan is difficult these days. Even if I could make the trip, the odds that I’d be able to make the trip coincide with a meeting are very slim.

Having resigned myself to the fact that I’d probably never be able to attend, a strange thing then happened. The world COVID-19 pandemic hit, and nobody was meeting in person anywhere anymore. But, after a while, people started adjusting to the new reality and the Zoom meeting became common. And, when I saw a notice on Facebook about the next Zoom meeting of the wasen study group, Wasen Kenkyuu Kai, I realized that a new opportunity had opened up.

I contacted the person who handles the posts on Facebook, and made arrangements to attend the meeting. I had an initial pre-meeting with the new contact Mr. Shinya Tominaga, and we had a really great conversation in english, with some Japanese exchange. Tominaga-san is, by the way, a member of the group Wasen Tomo no Kai, which operates several small boats to teach the public the experience of the traditional use of the ro, or sculling oar.

When the actual study group meeting took place, I was a bit nervous. For one thing, I’d never attended any Zoom meetings with more than one other person. Including myself, there were 16 people present. Of course, it was all in Japanese.

My Japanese speaking skill is maybe worse than my reading comprehension, if that’s possible. Who was speaking to who? And when someone said my name, I felt like a deer in the headlights, as everyone got quiet, waiting for me to reply. Since everyone looks at the screen, there’s no other indication that people are waiting for you, except when you’re sure you heard your name. Well, I managed, more or less.

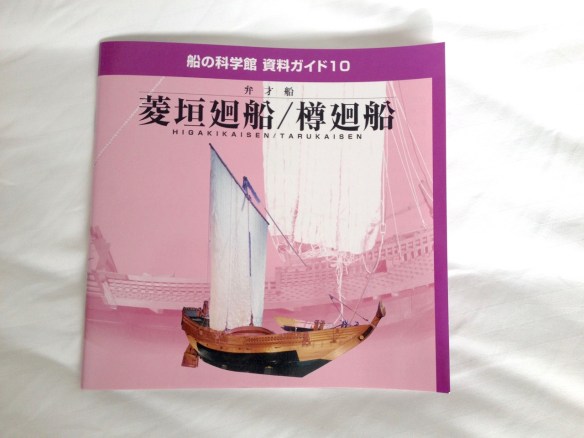
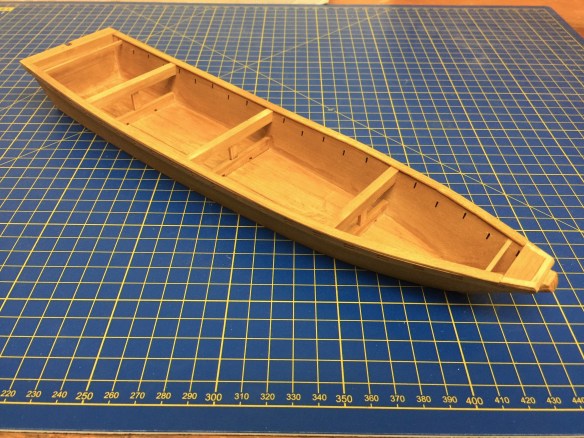
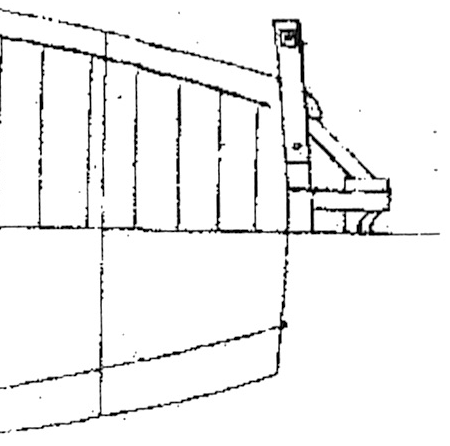
I did hold back a bit, as I was embarrassed that I didn’t understand more, and I may have disappointed the organizer, who I think may have believed I was going to speak more Japanese and participate more. But, my one contribution was to share a drawing that was given to me by Douglas Brooks, and my desire to find out if the boat in the drawing was recognizable.

The drawing of the mystery wasen

It did prompt a little discussion of the reverse sheer of the bow, which curves downward. This is called a nomeri-type. Professor Kon referenced some material about this type of bow, which was a feature found in the Kanto area, which is the area around Tokyo.

Also, another gentleman, who’s name I couldn’t get as most were shown only in kanji, seemed to know a lot about the nomeri type. I asked as best I could if this was a feature for sea boats. And, if I said it correctly and understood his reply, this is apparently the case.

Tominaga-san also showed a page that cataloged the boats used by the Wasen Tomo no Kai, which included the boat that I thought the drawing might represent. But, that boat was too short at less than 8 meters in length. The above boat is clearly more than 9 meters long. So, I’m not really any closer to knowing this specific answer. But, I did have something to contribute.

Actually, I did have a set of slides put together that showed most of my wasen models, but I felt too self conscious to take over the meeting to show them. Also, when people start talking about you and your work, and you don’t know what they’re saying, it’s a bit strange. So, I figured I’d hold off. I can alway show it at a future meeting, if I follow up on this one.

The meeting moved on from wasen models to the topic of chikiri, which are wooden dovetail fasteners used in Japanese woodworking, including Japanese boatbuilding. 

The meeting lasted about 4 hours, beginning at 1:30pm, Tokyo time, which means that it started for me at 9:30pm and didn’t get done until 1:30am. But, perhaps because of my nervousness and my desire to learn, I didn’t feel very tired, even after many hours had passed.

I’m glad I was able to attend. I learned some and it was a great experience to sit in with these knowledgeable wasen enthusiasts.

Ω

Looking for Yodogawa river craft detail

I haven’t tried this yet with this blog. Normally, I just post what’s new and what I’m working on, etc. But, this time I’m going to try asking for help…

Some Yodogawa 淀川 river boats and some sea boats in the Osaka area show a kind of stern structure that is different from other boat types, but I can’t quite make out the details from the few drawings and photos I’ve seen.

In another case, there is a model of a river gozabune from the Tokyo Museum of Maritime Science. I have some photos of it, but again, nothing that shows the stern in detail. Again, this is a boat from the Yodo river.

This is a beautiful model for which I have a nice drawing, but there is no scale and again I don’t really understand the construction of the stern.

Now, I could take a guess based on the drawings I have, but this is a very well known and often viewed model, so I’m hoping someone out there has some better closeup photos of it. Also, I need the exact length of model or of something specific on the model, as well as the scale, to be able to determine correct measurements.

There might be other models besides this specific one that shows stern features in detail, if you have any info, please contact me here through the comments section. Thank you!


Kitamaebune Website

Recently, I discovered a great website about Kitamaebune. I’m not quite sure who is running the site. It has some short, strange Youtube videos in Japanese, and some very basic travel information about the different port cities that were major places connected with Kitamaebune.

The site is simply kitamae-bune.com and it is in Japanese. However, there is an english language section that can be accessed at en.kitamae-bune.com, or to simply read about Kitamaebune, just go straight to en.kitamae-bune.com/about/main/ Ω

Building a Tenma-Zukuri Chabune (伝間造茶船) – Part 4

Uwakoberi, Koberi, and Iron Nails

So, with the koberi in place, I added the small deck at the bow and the ōtoko at the stern. I’m trying to find out the term for these small decks, which are more like steps. On the Hozugawa boats, the small deck at the bow is called omote-amaose. But, that’s an entirely different region, so I expect the term in Tokyo/Edo would be something quite different.

I also added the uwakoberi, which is what in the west, one would refer to as the gunwale or caprail. Each was made from a single piece of wood, wide enough to cover the edges of the hull planking and rub rail. I made mine a little wider, so that there is a slight overhang on the inboard side.

On tenmasen, the uwakoberi could be quite wide, serving as a walkway for the boatmen. I wanted to keep true to the Funakagami print, so I didn’t go too wide on this. Also, I had a hard enough time putting a bend in the wood. Any wider would have just made this task more difficult.

Continue reading

Building a Tenma-Zukuri Chabune (伝間造茶船) – Part 3

Construction of the model continues as I’ve been working out how I want to tackle some of the details on this 1/20-scale model. The major issues to deal with are the copper mortise covers and other copper detailing as well as the detailing of iron nails used to fasten the koberi, or rub rail, plus wire nails used to fasten the uwakoberi, or the caprails. Some of this is quite simple.

Below, I’ve posted a photo of Japanese modeler Kouichi Ohata’s Tenma-zukuri chabune. He has been helpful in the adjusting of the design of the drawings and has completed a model based on the drawings.

His model is built at 1/10 scale. I may eventually build one at this scale, but for now, I’m happy building mine in 1/20 scale, and I’m considering building other wasen of the Funakagami in 1/20 scale also. It saves on space!

Photo of Japanese modeler Kouichi Ohata’s 1/10-scale Tenma-zukuri chabune based on my plans, with a few modifications and added details.

Continue reading

Building a Tenma-Zukuri Chabune (伝間造茶船) – Part 2

In my last post, I discussed the building of a tenma-zukuri chabune from the Funakagami, and I stated that I was working on my model, but didn’t actually talk about building the model. The fact is that I wasn’t sure about what scale to build it at, given that a 1/10-scale model would end up being a little over two feet long, and I’m running low on space to display or store my models. So, I started a 1/20-scale model to see how I’d feel about the smaller scale.

I began by making a temporary internal frame. This would allow me to build the shiki, or bottom, and add the miyoshi, or stem, and the todate, or transom, at the proper angles. The same goes for the tana, or hull planks.

The longitudinal member of the framework is shaped directly from a copy of my plan drawing. The cross pieces are located at positions of the funabari, or beams, and are shaped according to my drawings.

Continue reading

Building a Gozabune (Kobaya) from Paris Plans – Part 12

Work on the Kobaya is moving forward again. While coming up with a way to deal with the decorative patterns on the hull has held me up, I did have some ideas. But, the best I could think to do required the use of a new tool, and it took me a while to bight the bullet and buy it.

Note the pattern of the chain of hexagons and what look like little sunbursts in the Paris drawings.

The solution I came up with was to either create a mask for painting or possibly for the application of gold leaf, or to simply cut a pattern that was itself gold leafed. This probably sounds more complicated than it turned out to be. The central part of the solution turned out to be the use of a vinyl cutter, like those used in scrapbooking.
After looking at a few of the leading models, I finally made the leap and bought a Silhouette Cameo 3. I found one for about $200 online and spent another $150 or so on materials and accessories.
The closest competitor to this was the Cricket Maker, but it was more expensive and the drawing software was only usable online, requiring an internet connection to use. Having Internet is not an issue, but requiring it to use my own hardware or even to create drawings was not an idea I like supporting.
I was able to test out Silhouette’s drawing software for the Cameo, which was available as a free download from their website. That allowed me to determine that I would at least be able to create drawings of the things I needed it to cut.

Continue reading