Building the Tosa Wasen – Part 1

The build begins with the floor piece. There are apparently different regional names for this and I don’t know what the name is in the Tosa region. The term カワラ, or Kawara, is shown a lot for it in the instructions, so I assume that’s the regional term in Tosa. I’ll have to send an inquiry about these things at some point.

The first step in the kit is to bevel the bottom edge of the kawara. To aid in this, there are laser scribed lines. Interestingly enough, the sheet with this part is actually scribed on both sides. I’ve never seen that in a model kit. This means that the manufacturer had to register the wood and the laser in some way so that the cuts on one side line up with those on the other side.

IMG_0235

Something interesting about working with the Japanese cedar. Where those dark lines in the grain show, that’s where the wood is more dense. When carving, you have to be aware of that because those lines are harder to cut through than the lighter colored wood in between. These dark lines are also harder for the laser to cut through. So, if you look in those etched trapezoidal holes, you can see lines of wood that line up perfectly with the grain. I started to trim out those ridges in the cut-outs. There aren’t that many really, so I’ll probably continue with that as I go.

The other issue with those lines is that they can make the laser scribed lines very hard to follow. Woody Joe uses laser scribing to mark the beveling lines on their kits too, but they use light color Hinoki, so I ‘ve never had to deal with hard to see scribed lines before.

The next thing is to partially cut through the Kawara at the dashed line.

IMG_0236

This is where the bottom of the boat angles upwards. In his book Japanese Wooden Boatbuilding, Douglas Brooks describes this as Kirimage (kee-ree-mah-gay), or “cut bending”. I don’t know about the Tosa boats, but the Aomori boat he worked on used a technique like this, though there’s more to it.

In my case, I thought this was a good opportunity to bring out my Japanese hobby saw, which is a very thin pull-type saw. The problem was that it was too thin. It cut nicely, but didn’t leave room for the piece to bend upward. So, I pulled out my old razor saw and I cut the line several times, holding the blade at different angles, so that it would cut more of a V-groove.

IMG_0238

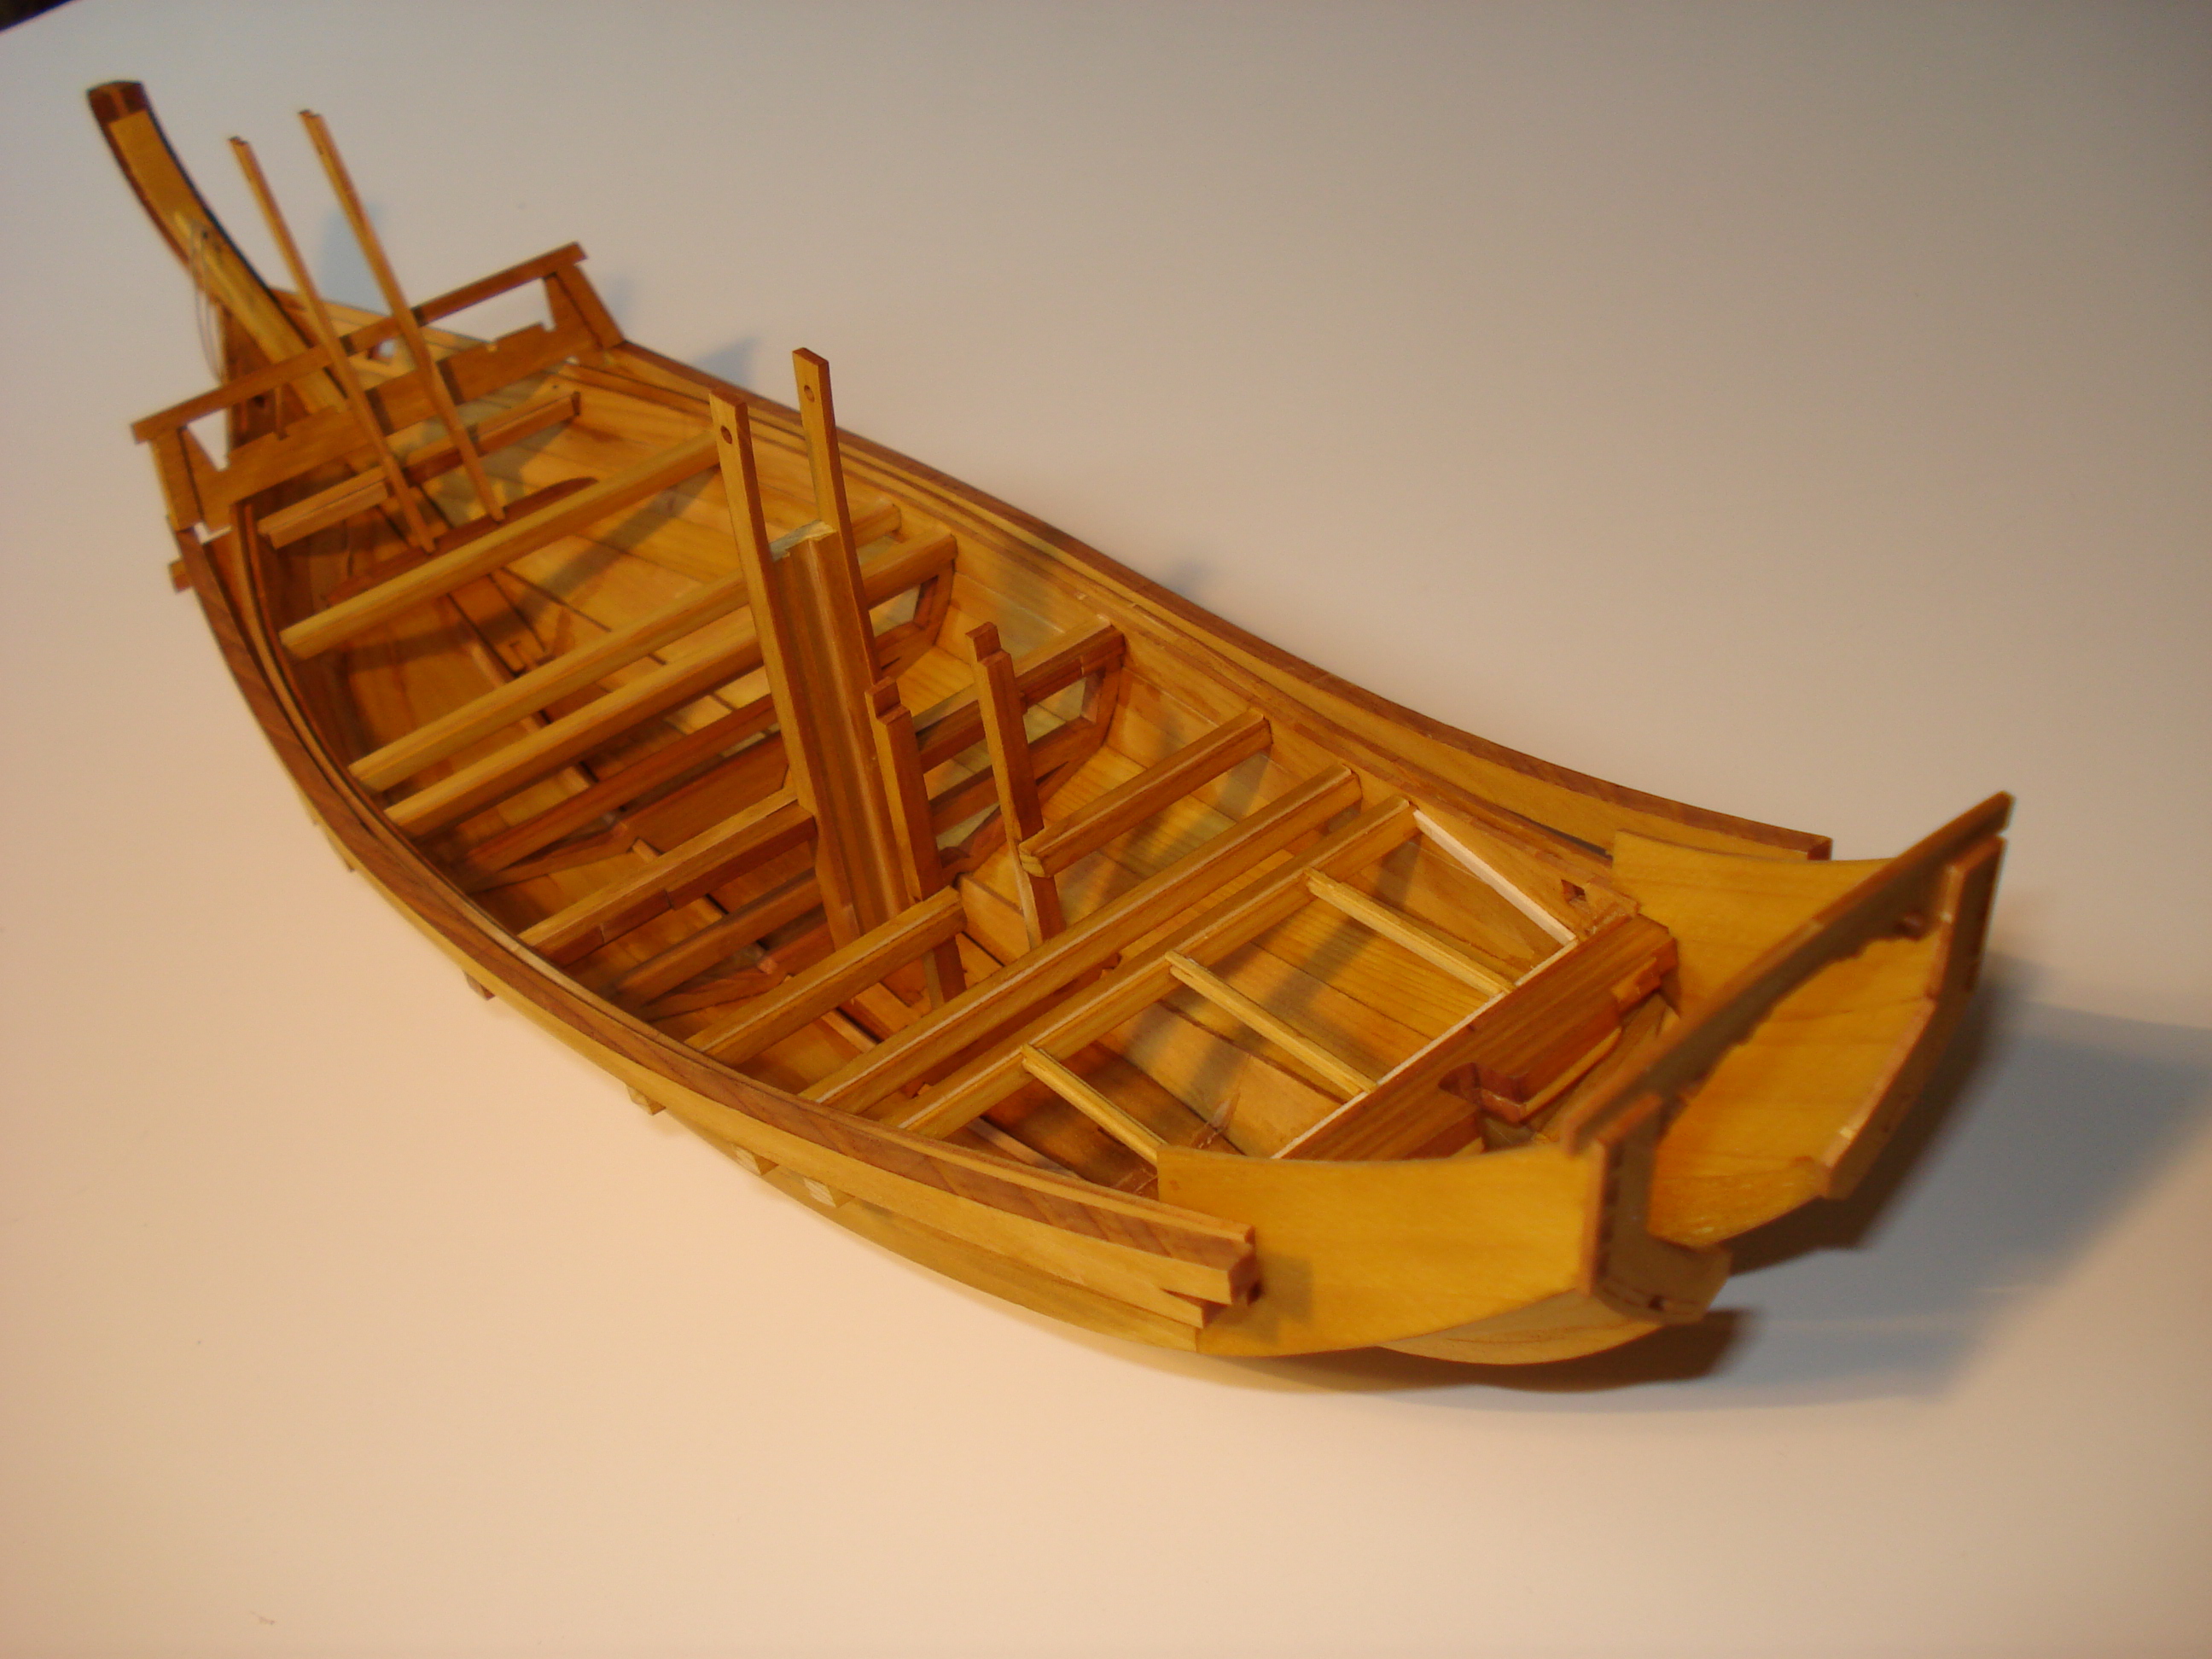
With that done, I could add the floor frames. These are permanent frames, thought a long strong-back piece serves as a temporary alignment guide. This was interesting because so many Japanese boats are frameless, or close to it. At some point I’ll look into this further. On the real boat, these may have been added after the planks were in place.

There was a fair amount of char on the edges of these and all the other wood pieces. The kit includes a large flat sanding block that made clean-up of these parts pretty easy. I did notice that there was a fair amount of smudging on the wood faces though. I cleaned these up as best I could. I used the sanding block, but tried to keep working very lightly.

IMG_0243

I test fit the stem to how it was all going to work. The stem is made up of an inner piece and an outer one. The outer stem gets added later, but the inner one goes on next. I wanted to make sure I understood the design before continuing.

IMG_0241

First, I had to made sure the strong-back was properly aligned. The main issue was to keep it centered and perpendicular to the Kawara. The piece is also to be spot glued at the very ends to keep it in place until it is removed in a later step.

IMG_0246

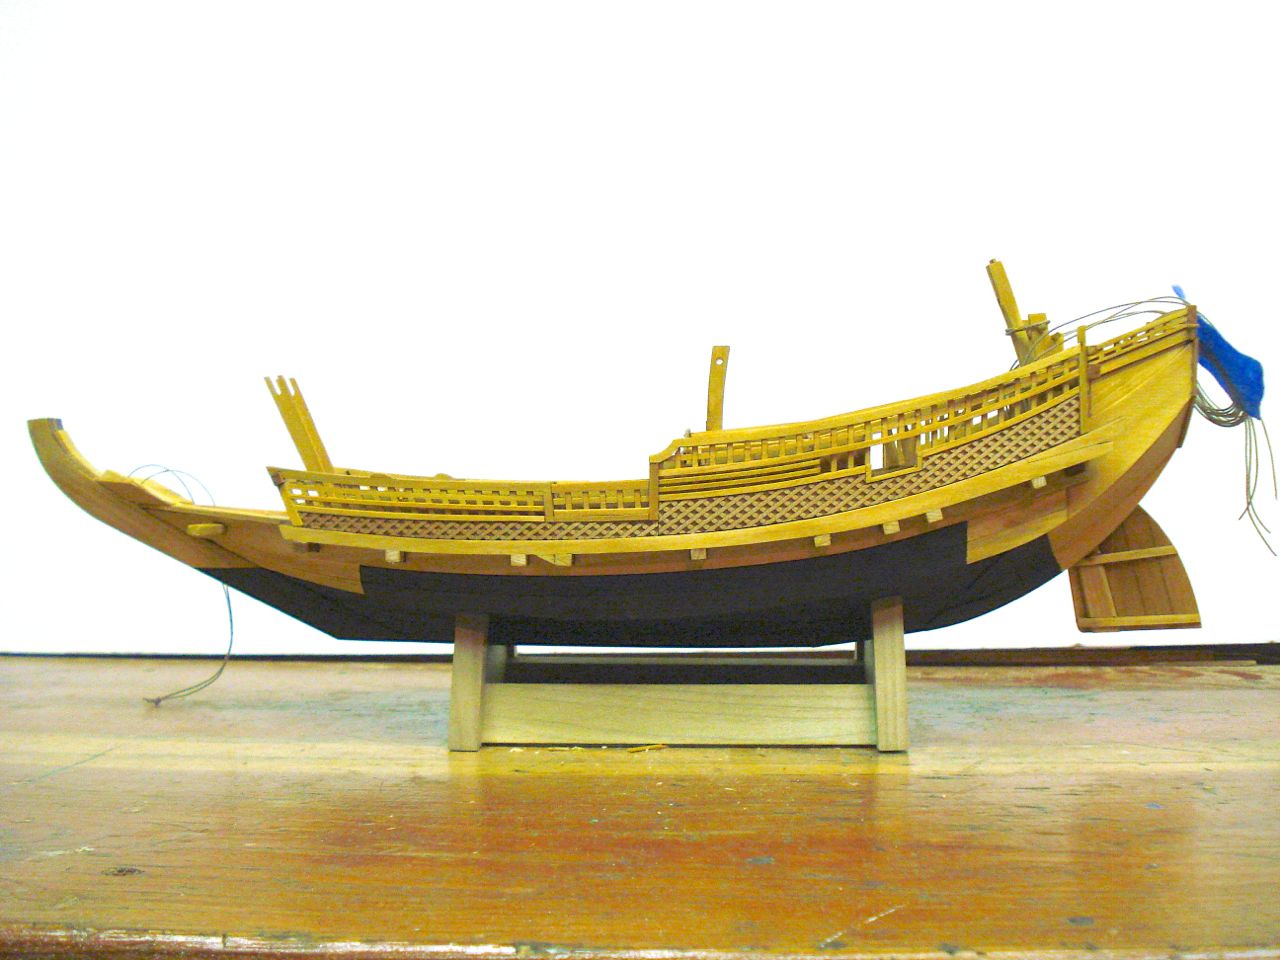
Here’s where I’m at now. Steps 1 through 6 have been completed. I have only to bevel the stern most frame and the transom to complete step 7, then comes the lower planking. Japanese boats use very wide planks that are often very thick. On the Tosa wasen, the planks appear to be as much at 18″ wide.

IMG_0249

I went ahead and started prepping the lower planks. Where I am cutting in the photo, the laser does not completely cut the dark lines of the wood, so I have to go over this with the X-Acto a few times on each side to cut the pieces free.


Higaki Kaisen model completed

After a few marathon ship modeling sessions over the past week or two the Higaki Kaisen model is done. Well, more or less. I got through the last of the construction steps, but still have a little cleanup left to do and tying off of some odds and ends.


DSC02500


Today, I finished the task of the name banner that flies at the stern. This a traditional style Japanese banner called a “nobori”. This one consists of a flag pole with a cross pole at the top. The banner has loops of cloth along one edge and across the top that fit the poles. The includes cloth for making the banner, but you’re supposed to write the ship’s name on it. Since I can’t write kanji, I resorted to printing the name onto paper using my computer.

For this ship, I chose to use the name Kakehashi (kah-keh-ha-shi), which is means bridge or connection. In this case, the model is something of a bridge between my interest in ship modeling and my interest in my Japanese heritage. Actually, the full name of the ship is the Kakehashi Maru – Maru is a suffix that is used for ship names.


DSC02481


This is definitely not the kind of model that gets easier as one gets near the end. Rigging the sail was quite a challenge with 38 lines tied to it’s edges. What you might call the sheets consist of 13 ropes tied to the foot of the sail with the other ends tied to a heavy rope that runs between the bulwarks railing. I had quite a time adjusting these lines to get the sail shaped the way I wanted. In the end, after I got the lines all about equally tensioned, I realized I wasn’t all that happy with the shape the sail had taken on. But, with so many ropes and knots, I just adjusted the sail as best I could. The next day, I looked at the model with fresh perspective and was much happier with the sail.


DSC02443


One of the last things on the model is the adding of the copper capping. Copper caps cover the end up many of the beams. At the stern, small copper strips simulate the nail covers. So much copper is added at the stern, that this section appears quite ornate. I ended up using contact cement to fix these into place. It’s a little messy, but seems to clean up fairly easily. Also, used properly, you have a little time to adjust the pieces after they are laid into place. But, be careful of the brand you use. Read the directions as some are specifically not to be used with copper.


DSC02493


Other finishing touches included the anchors, the stay on the mast and all its details.


DSC02501


DSC02487


DSC02484


There are still a couple things that I may yet add to this model. Often, ladders have been used on the main decks of the replica bezaisen to climb up on the main cabin roof deck without having to go inside the cabin, and the same for the forward deck house or Kappa (cop-pah). Also, these ships traditionally carried a small boat called a Tenma-Bune (ten-mah-boo-ney) which was used for going to and from shore or other ships. I’d like to scratch build one and add it to my Higaki Kaisen model, but we’ll have to see if my understanding of the construction of these Japanese wasen is up to the task.

DSC02492


This has been a very different, very interesting, and extremely fun build. Woody Joe kits might seem a little pricey in the US, particularly for the small size of this model in particular. But, in the end, I think it’s been a great value. I’ve learned something about traditional Japanese ships and the model has been a great challenge.

If you’re interested in the kit, there are a couple things you may find of interest. One is that there are a lot more Amazon sellers listing this kit, though they are almost all in Japan. But, I no longer see the price gouging attempts on Ebay and Amazon that I once did. My personal recommended seller does not have an Amazon store, but is, of course Zootoyz. And if you do buy from Morikawa-san, please tell him I sent you.

But, another interesting turn of events is an importer that is reportedly bringing several Woody Joe kits to market in the US, primarily through Amazon, but with instructions he’s had translated into English. I don’t know what they’ll end up charging for the kits, but it will probably be more than what you would pay for the kits directly from Japan. Of course, with the kits from Japan, you’ll have to deal with Japanese language instructions. But, as I mentioned before, the instructions are very well illustrated. For the Higaki Kaisen, there is of course this blog, but also my plan is to write up a multi-part article for Ships in Scale magazine that should take the guess work out of the Japanese language instructions.

So, stay tuned, Higaki Kaisen fans. There should be more to come!

Woody Joe’s Higaki Kaisen – More of a Challenge

The last time I wrote about my experiences with Woody Joe’s Higaki Kaisen kit, I described the issue of interpreting the Japanese instructions. The main issue there being that some steps in the instructions tell you not to glue certain parts together, and if you’re not aware of them, you’ll run into a few problems.

Well, I can tell you now that there is much more challenge beyond just watching for those key steps. I’m over 80% complete with this model and it’s been weeks since I’ve had to worry about not gluing certain pieces together. Instead, the main challenge of the ship model is cutting and aligning strip woods and laser-cut parts in the construction of the upper works of the ship.

Things slowed down quite a bit as the main effort has been with the final alignment of parts. All those earlier steps where parts were put into place now come to the test – How good a job was done on alignment of the parts in those early steps? Now parts are put into place and the you find out if they fit correctly.

Alignment Issues

In my case, there are some places where I found that parts were not quite where they should have been. In most of those cases, there was nothing terrible that stood out. However, I did end up with a gap when fitting a particular laser-cut piece into place in step 60 (out of 90). This step involved the completion of the upper works at the stern or what might be termed the poop.

Because I didn’t have everything in perfect alignment in an earlier step, I ended up with a slight gap later. This might not have been that noticeable, but I thought it best to fix the issue. There’s nothing that says you have to use the laser cut parts in the kit, so I simply took some of the scrap wood and fashioned a replacement.

DSC02212

An unsightly gap.

DSC02217

Alignment of the replacement piece.

DSC02222

The completed stern.

DSC02227

The completed stern and deck.

Not Quite According to Instructions

Another place where alignment issues came up was with the inner and outer upper walls, or bulwarks. In many ways the walls are somewhat “free floating” and don’t depend on each other too much, particularly around the main cabin. However in a later step, step 69, your supposed to fit 3mm wide stripwood pieces between them.

In my case, the separation between the walls was close enough to 3mm to work in one spot, but  the other spot where a stripwood piece was to fit, the separation was closer to 4mm. Fortunately, this didn’t affect anything significant, and I was able to use a 4mm wide strip instead.

DSC02232Different width stripwoods to make up for alignment issue.

Overall, I’d say that Just about two-thirds of the way through this kit, it kind of changes from being an assemblage of pre-cut parts, like a plastic kit, to the kinds of work you might normally expect in a wooden ship model kit. There’s a lot of cutting of stripwoods and a lot of time is spent doing a final fitting of railings, trim, etc.

Cabin Roof Configuration

Steps 64 through 67 involve the construction of the main cabin roof or quarter deck. While I cut and fit the beams into place, I decided to hold off on gluing them in or planking until I figure out how I want to display the model. The instructions show an example of how to show off the interior detail, but I’m still thinking about it.

DSC02253

Cabin roof beams fitted, but not glued in yet.

Painting the Hull

Before continuing, I decided it was time to paint the lower hull. This is not a step described in the kit, but bezaisen seem to have been painted black in a very particular way that doesn’t exactly follow a waterline. I used available drawings and photos of replica ships as my guide.

DSC02244This photo was taken after I completed the outer hull wall and details.

The last thing I’ll mention here is that adding the outer hull walls or bulwarks was extremely satisfying as this is when the ship pretty much looks like a bezaisen. The lattice work of the Higaki Kaisen is very thin and delicate because of the laser etching on the surface. It had to be trimmed very slightly to fit, and took a lot of care to keep from ruining it, requiring a very sharp blade. I used just a light touch of wood glue on the back to make it just tacky enough to hold it.

I’m just about 80% done with the model – getting close! Ω

Further Thoughts on Woody Joe’s Higaki Kaisen

I’ve had the Higaki Kaisen kit for close to two months now and I’ve been working on it pretty steadily except for about a 2-week period where I couldn’t due to the holidays and a shoulder problem I had. But, I’ve had a chance to work on it again and develop some more thoughts on the kit itself.

DSC01908

This is still a really fascinating kit and at about half-way through, it’s still fun and challenging. I’m spending a lot of time now on interior details and I’m finding that the level of challenge seems to be increasing as I get further along in the build. But, my comments on the amount of care and patience needed still hold. You really want to study the illustrations very carefully, and at this stage, you also have to be consulting the plan sheets to check measurements for the deck beams and such.

I’ve had a chance to go over the text in the instructions with someone who can read Japanese and, had they been written in English, I think it wouldn’t make all that much difference. Much of the text is there to remind you to be careful or to watch to make sure you glue a piece on with the correct side up or make sure that you line up the parts along the edge. Most of these things you can get from close study of the illustrations.

Here’s a helpful clue to successful build of this model: There are times when you are not supposed to glue parts together. Of course, this instruction is given in Japanese. However, it is always noted in red and if you can spot the Kanji (Chinese characters), you can “read” these most important instructions. The text to watch for is 接着. These are the characters for “bonding” or “gluing”. If these characters are followed by either of the negative verb endings しない, or しません, then don’t glue the indicated parts. When parts are to be glued together, the characters for gluing (again, that’s 接着) are usually followed by しますor する or simply have no verb ending at all.

So, summing up:

接着しません or 接着しない = Don’t glue together

接着します or 接着する or just plain 接着 = Glue together

This might seem like too much to deal with, but actually there isn’t a tremendous amount of text to follow. There is no separate written paragraphs of instruction, unlike in many Western kits. All the instructions are in simple steps, so there are only a few sentences with each illustration. Also, the text to watch for will be marked in red. Finally, Japanese verbs come at the end of sentences, so they’re pretty easy to locate (plus, the Japanese period is an open circle “。” – easy to spot).

DSC02080

Above is an example of a piece not to glue into place. In this case, you are just using the piece to aid in getting a proper angle on the cross-beam. I circled the important text in a green dashed line.

DSC02077

Here is another example where you are instructed not to glue the dowel in place. If you look ahead in the instructions, you will find that you later need to be able to push the dowel out temporarily.

DSC02078

I include this to remind the builder to look carefully as the text telling you to glue the part is similar to that which tells you not to glue. Proceed slowly, look ahead and study illustrations carefully.

I recommend going through the whole instruction book and searching very carefully through the text before beginning the build. Circle any occurrence of 接着しません or 接着しない to flag them so you’ll clearly catch them later. There really aren’t that many times that you have to avoid gluing parts, but if you miss the call to not glue, you’re going to be trying to pull apart parts at some point. On that matter, I’d also suggest that you glue sparingly. The parts in the kit are pretty light and don’t need much glue to secure them.

Alignment of parts is probably the trickiest part of this build. I’m finding it best to read ahead in the plans, see what parts are in contact with what and do a lot of test fitting. In some cases, I found it best to jump ahead on some small sub-assemblies to make sure they’ll fit into place properly when the time comes to glue them into place.

I’m about half-way through this model and I’ve run into mistakes I’ve made, most of which I was able to fix one way or another. In most cases, I glued where I shouldn’t have, but was able to pop glue joints loose to make corrections. There was one issue with the hull planks where they didn’t come together too well and I ended up having to fill a small gap, but that shouldn’t be too noticeable in the end.

DSC01970DSC02065


I’ll post more about the build later. But, I think I’ve pretty well covered the issues you will run into when building this kit. I’m still really enjoying this build a lot. It’s neat to see it come together and the details are nice. This is definitely a kit for the patient and careful, but adventurous modeler. Ω

Initial Thoughts on Woody Joe’s Higaki Kaisen

Recently, my kit review of Woody Joe’s Kanrin Maru kit was published in Seaways’ Ships in Scale and I’ve since begun looking at Woody Joe’s Higaki Kaisen kit. I’ll develop a complete review pretty soon, but I have had a chance to work on the model a bit and I do have some initial thoughts on the Higaki Kaisen kit.

DSC01678

My first impression is that it’s a fascinating looking build of a traditional Japanese ship. There are a lot of laser cut parts and it’s missing the traditional framework we’re used to seeing in ship model kits, but there is a small set of frames that make up temporary building molds that helps hold the hull parts in place during construction.

DSC01696

Continue reading