Unknown's avatar

About catopower

Ship modeling since 1993.

Building the DNB Maru – A Niigata Honryousen – Final

The Honryousen model is done and been sent to its new owner in Washington state.

The blocks at the ends of the hull turned out to be somewhat challenging to make due to a combination of the way they fit notches cut into the hull planks, plus the angle of the tateita, or the bow and stern planks. Also, the blocks have a peak in the center that look best if they are roughly level with the waterline. That’s not always the case in these types of boats as I’ve seen in photos.

The small deck at the stern wasn’t too much of a problem. I began by making a funabari, or beam, which I notched into the hull planking. As there are no fasteners used, the shallow notch I cut was helpful in holding the beam in place. The inward pressure of the hull planks also help to hold it in place. I used a small amount of carpenter’s glue to help secure it, just for good measure.

Continue reading

Building Woody Joe’s 1/72-scale Kitamaebune Kit – Part 10

I’m now in the final stages of the building of Woody Joe’s Kitamaebune model kit. I’m working on the sails and rigging and dealing with a few small remaining details.

The kit sails are very nice, and have the sail seams and lacings printed on them. From a normal viewing distance, they look great, and I’ve gotten compliments from those who glanced at them and thought I’d stitched them. But, I’m going to need a main sail as well as one at the bow and I want them to match. The only way to do that is to make them both.

The big issue is that I’d love to be able to detail the Japanese-style sails, which are made of separate panels that are laced together. The design is such that the sails are effectively self-reefing, so that they spill the wind when it gusts. This design is more apparent on sails of smaller vessels, and I don’t know if the lacing between all of the panels are that way, or just between the four large groups of panels. But, you can see the idea in a pair of photos from ModelShipWorld member marcjp, who lives in Osaka, Japan, and took these photos of the museum ship Naniwa Maru.

Continue reading

Building Woody Joe’s 1/72-scale Kitamaebune Kit – Part 9

I’ve finally made significant progress, though most of it doesn’t really show, as so much is in the small details – the simulated copper coverings are finally done!

This took me a while as I kept thinking I was done. Then, I’d think some more and realize there was some other feature I wanted to add. I’d no sooner finish that, than realize I really should add yet another feature. This cycle has repeated itself many times, but I think it’s over now, and I can put that equipment away.

The next item I decided is pretty straight forward and related to the vinyl “coppering” details. Often times, the coastal transports, known generally as bezaisen, are shown with nail heads in the bulwarks fences. Adding these at this scale may be a mistake, but I’ve started down the road – No turning back now. I drilled out all the necessary holes which will be plugged with some 22 gauge copper wire. I intend to blacken the wire using liver of sulfur.

IMG_0429.jpg.45dcfb023d8948c8297a948bc7cae8f0.jpg

Holes were drilled out and I started the process of making copper “nails”. The heads have to be flat, so I filed the end of the wire and then cut the “nail” off.

IMG_0431.jpg.3dded1a03077b9d0da98bf12d01a0c32.jpg

Continue reading

Building Woody Joe’s 1/72-scale Kitamaebune Kit – Part 8

More and More Copper Details…

This project stalled a bit while I was adding the copper coverings detail, which I’ve actually been making using brown permanent adhesive vinyl that I laid out and cut using my Silhouette Cameo 3 machine. The slow down is simply due to the amount of small details I’ve been feeling I need to make.

As I’ve written earlier, I reproduced the kit-provided shiny copper pieces with vinyl ones using the Cameo’s feature called PixScan, which allows me to use a specially marked mat on which the parts are placed and to take a photo of the them. This gets imported into the Silhouette Studio software and I am able to recreate the parts from the photo.

Part of the process is automated, but it works much better for larger objects. The small parts in this kit require that I do a lot of editing to sharpen up and straighten up the cut lines.

Woody Joe product image of the completed Kitamaebune kit.

In addition to those parts, I’ve been studying my photos of the Hakusan Maru, the kitamaebune on Sado Island, to figure out what other copper plates I need to make. There are a LOT of copper coverings on these ships, so the project seemed a bit overwhelming. Each part had to be measured on the model, which does not correspond exactly to this particular ship, and drawn in the Silhouette Studio software. Then, the Cameo cutter was set up with a piece of the same brown colored vinyl on a light adhesive cutting mat, loaded up, cut, unloaded, vinyl removed from the mat, mat put away to keep it clean (more like keeping it from getting too dirty). Finally, the pieces are carefully applied to the model.

Stern of the Hakusan Maru on Sado Island showing all the copper plates and the iron work on the rudder.

Bow of the Hakusan Maru on Sado Island showing lots of small copper plates on the real ship.

Continue reading

Building Woody Joe’s Nihonbashi Bridge Kit

While this is about building a bridge model kit, it wouldn’t be complete without wasen on the canal below. The bridge model kit was the easy part – scratch building tiny wasen was much more difficult. But, admittedly, painting the tiny figures was probably the hardest part of the making of this neat little diorama from Woody Joe.

catopower's avatarShip Modeler

Earlier this year, I decided to take a short break from ship modeling projects and spend a week or so on something fun, but a little different. I have several small kits in my stockpile (what’s in yours?) of miscellaneous Woody Joe kits, including one of the famed Nihonbashi Bridge.

The bridge was originally built in the early Edo period, around 1603. Built in the heart of Edo itself, It was extremely significant, as it was officially the starting point of Japan’s 5 major roads. Yes, all roads lead to Nihonbashi, and the bridge appears in many Japanese woodblock prints.

So, I decided to start the kit, which I purchased from where else but Zootoyz.jp, for about $41 plus shipping. One of the driving factors in building this kit is that it would allow me to exercise some of my basic diorama building skills. After all, there are trees, the…

View original post 1,315 more words

Building Woody Joe’s 1/72-scale Kitamaebune Kit – Part 7

The Tenmasen

This Woody Joe kit does not include a tenmasen, which is the small ship’s boat used for transferring crew and cargo to and from the ship, but neither did their Higaki-kaisen kit. The tenmasen is normally carried across the deck, atop the kappa, which is the small forward cabin where ropes and sails are stored. They are used by the Higaki-kaisen as well as the Kitamaebune.

Image from a Tokyo Maritime Science Museum book on bezaisen such as the Higaki Kaisen and Kitamaebune. Note the tenmasen forward of the open main deck.

Up to now, all the tenmasen I’ve seen illustrated have been pretty heavily constructed boats, propelled using one or two ro, or sculling oars. In contrast, the tenmasen recorded in the Paris illustrations is very wide and flat, appears somewhat lightweight, with a shallow draft, and is equipped with a pair of sculling oars, as well as 10 paddles, which are used much like western-style oars.

Tenmasen reconstruction at the Hakusan-maru Museum on Sado Island.

Continue reading

Building the DNB Maru – A Niigata Honryousen – Part 4

I’m going to keep this posting short, as it’s kind of a major milestone, with the finishing of the boat’s basic hull shape.

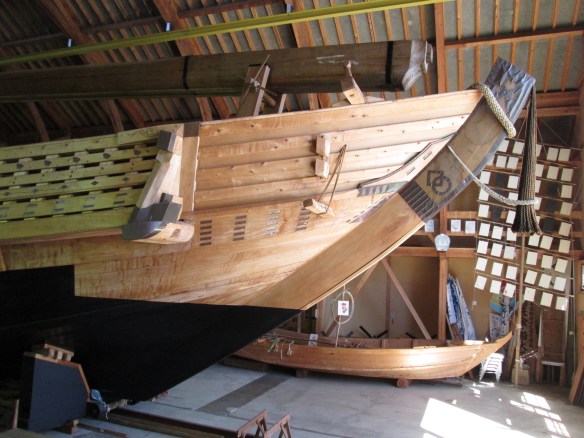
The full-sized honryousen completed and on the water. Photo by Benjamin Meader.

With the hull planks, locally called hoteita (ho-tey-ee-tah), glued into place, the bottom edges of the hull planks were easy to trim, as they just had to be flush with the bottom. For the top edge, I had some measurements to go by, and I used thin strips of wood to use as battens, clamping them into place along the inside of the hull. The top edges of the battens marked the top edges of the hull planks.

With the battens clamped in place, I made adjustments to the height at various locations along the hull. But, the most important thing was to make sure it was a fair curve, Once satisfied with the curves, I marked the hull planks with a pencil line drawn along the top edge of the battens, then started the process of whittling the wood down to that line.

I used a large hobby knife to trim away the bulk of the excess, paying close attention to the wood grain, which wood would split along. When most of the wood was trimmed away, I then used the mini-block plane to do the fine shaping. A little final go with a sanding block cleans up any little variation.

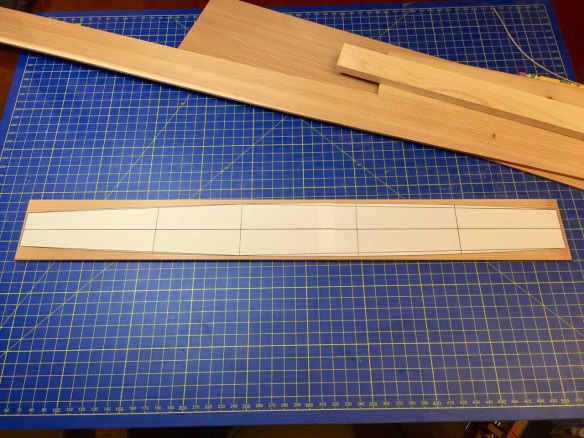
The mostly final curve of the hull. In front of the model, you can see my Japanese squares marked in shaku/sun instead of feet/inches. Also, there’s the miniature block plane I used for the fine trimming.

The next steps of the major construction issues are the addition of the single beam of the boat, and the blocks that fit at each end of the boat. The beams are called funabari, but I don’t know the term for the blocks at the ends of the boat yet. Looking into that now.

These parts are made from a lighter-colored wood on the real boat, though I’m not sure of the exact species. For my model, I’ll use hinoki, which I now have a small supply of.

Japanese Boat Model in Western Art

A fellow ship modeler sent me a photo he took at a Tissot exhibit at the Legion of Honor in San Francisco recently. Jacques Joseph Tissot was a French painter who is famous for his  biblical paintings as well as his paintings of fashionably dressed women of everyday life in France and England. Fortunately, his works are all in the public domain, so I can comfortable share it here.

One painting in particular is called Young Women Looking at Japanese Objects, which he painted in 1869, shortly after the opening of Japan to trade. It depicts two young ladies looking at a large model of a gozabune, a kind of royal yacht used by the Japanese Daimyo in their local travel.

It’s not a very good view of the model, but a closer look shows some detail, which is nice to see. There even appears to be a small figure standing in the opening at the stern.

Of interest to me is the fact that this is a painting of model as it appeared in 1869. It is not unlike other models I’ve seen, probably about 1/20 scale. I specifically note that the rudder and oars are all painted red, and the ceremonial banners and there are several ceremonial banners and poles flying at the stern.

There appears to be a banner flying forward and above the tall deck houses, but it is partially obscured, and I don’t have enough knowledge to identify the crest displayed on it.

I can’t help but wonder what ever became of the model…

Building the DNB Maru – A Niigata Honryousen – Part 3

Planking the hull is a somewhat tricky process. There are no frames to glue to, so clamps are next to useless, except to hold the former in place. Also, this is an open boat that, like the full-sized boats, will have no finish on it. It’s too small to nail together, so the hull will be held together with wood glue.

CA, or instant glue, will stain the bare wood. If I were to apply a finish on the completed model, I might be able to get away with using CA. But, with unfinished wood, it will mar the model’s appearance. To keep it looking as clean as possible, I’m using yellow carpenter’s glue, which cleans up with water. The only issue is that the parts will need to be held together while the glue sets.

Since I can’t use clamps, tape is being used to hold the planks in place while the glue dries. For this, I’m using low-tack painter’s tape.

Continue reading

Building the DNB Maru – A Niigata Honryousen – Part 2

Construction of the Honryousen model began with gluing patterns to the wood for the shiki, or hull bottom, and the ottate, which I am told is an informal local term for the bow and transom planks. From an earlier build of a kawabune (riverboat), I learned that the common formal term for the bow plank is omote no tateita and the term for the transom plank is the tomo no tateita.

Honyousen side profile I created in Adobe Illustrator

Patterns were simply printed on large format paper and glued to the wood using rubber cement. This stuff sticks well enough and rubs off pretty cleanly after it has dried.

When I started this project, I wasn’t sure if I needed to build a former for it, like I have for all the other scratch built wasen models I’ve made. The former serves as a temporary backbone and framework that wood hull parts can be clamped to while gluing into place. Instead, I thought I might be able to hold the parts together and band them into position using clamps and such, much like the real boats are constructed.

Continue reading