Building a Gozabune (Kobaya) from Paris Plans – Part 14

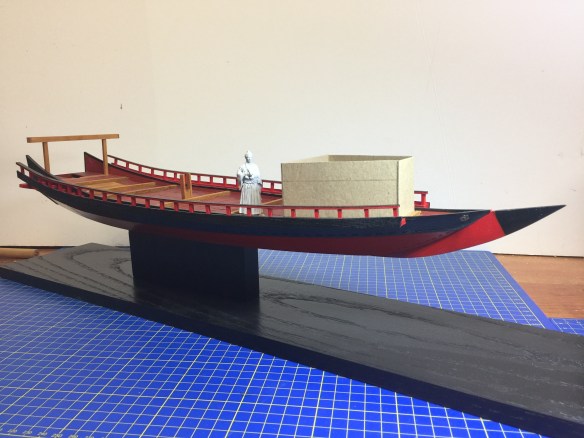
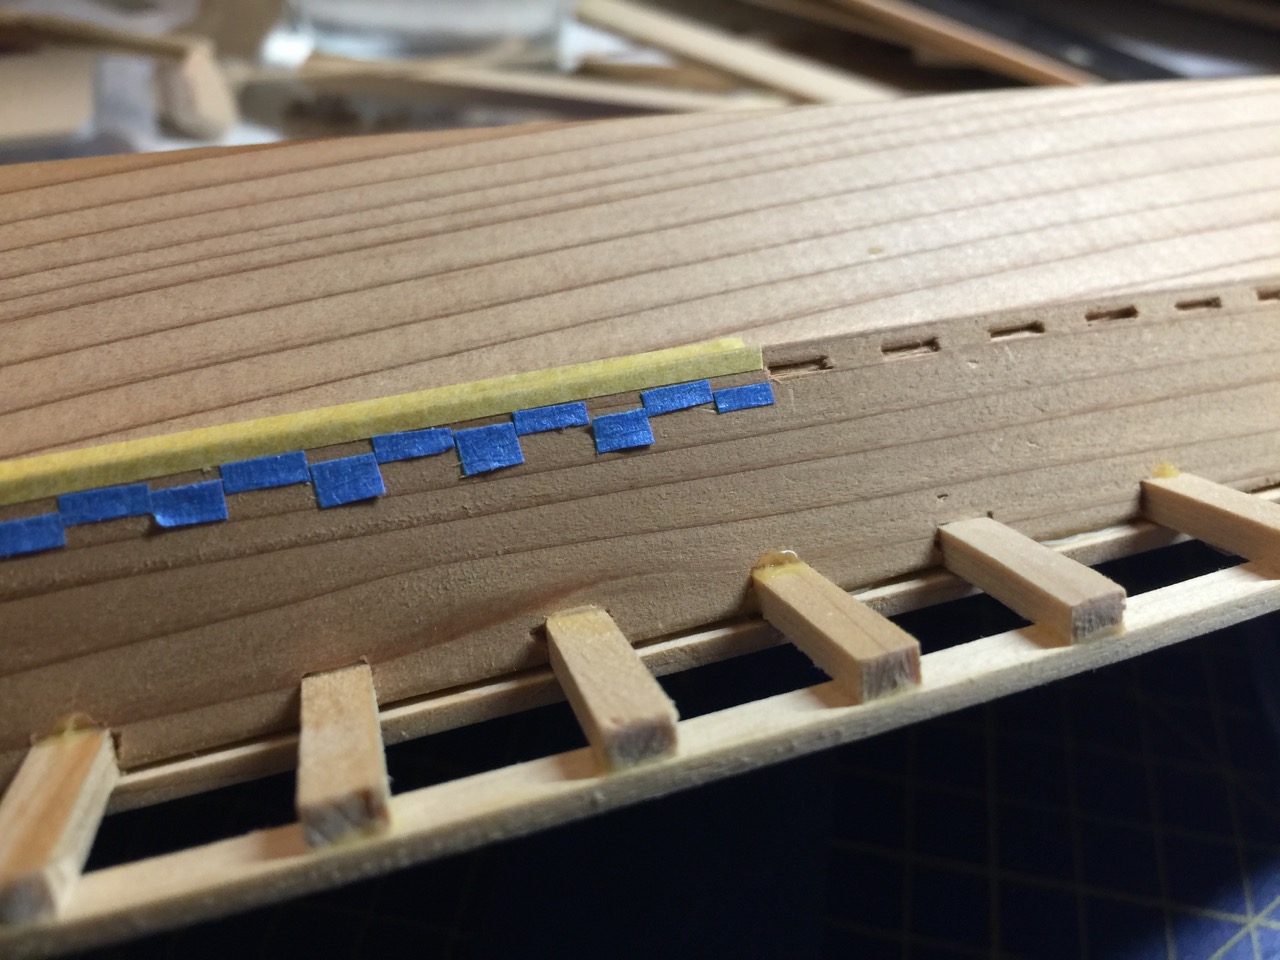
An update on this model is long overdue. While I hadn’t really been working much on the Kobaya model, it is a model that I’ve been very happy with. With the release of the new Shōgun TV series (more on that in another post), I’ve found something of a renewed interest in working on my wasen models, particularly in my kobaya model, as I knew the next steps I wanted to deal with. So, I brought the model down from the shelf, cleaned it up, and immediately started working on it again.
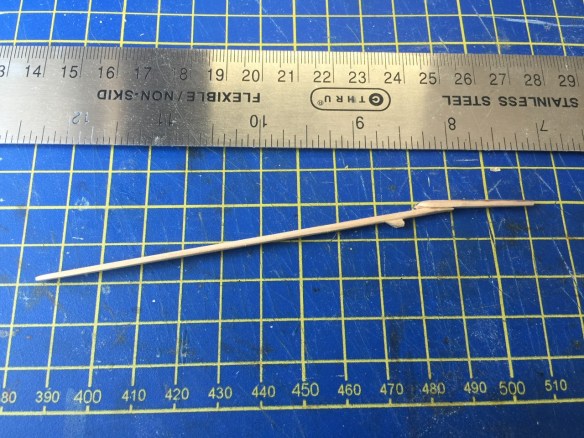
The model is inching closer to completion now, with the biggest hold-up being the making and mounting of the ship’s 28 sculling oars. Given the size of a person on the model, the deck would have been crowded with oarsmen. With such a sharp hull and relatively small size (17m) in comparison with the largest of ships at the time (30m, give or take), those 28 oars must have made her very fast.
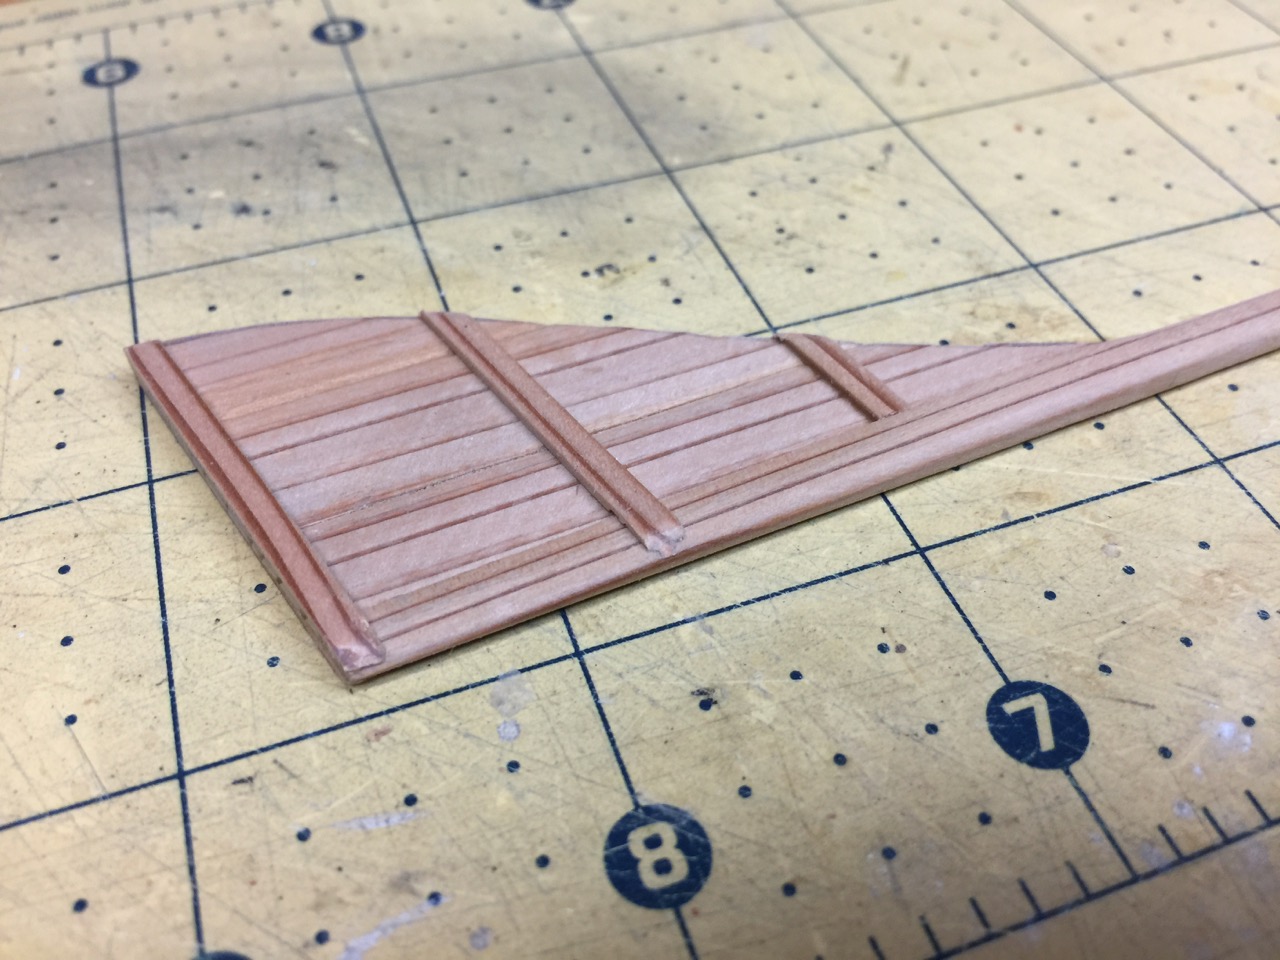
Below is an one of the sculling oars, which in Japanese is called a “ro”. It’s not complete as it need a rope wrapping where the head and the body overlap. It also needs a small handle that should stick up near the end of the oar’s head.

Continue reading

Building a Gozabune (Kobaya) from Paris Plans – Part 13

An update on this model is long overdue, and while I haven’t really been working much on the Kobaya model, it is a model that I’ve been very happy with. I’ve recently been researching old drawings, looking for atakebune information, but mostly finding sekibune and other small ships. As a result, I’ve found something of a renewed interest in finishing my kobaya model, and started working on it again.
The model keeps inching closer to completion, with the biggest hold-up being the making and mounting of the ship’s 28 sculling oars. Given the size of a person on the model, the deck would have been crowded with oarsmen. With such a sharp hull and relatively small size (17m) in comparison with the largest of ships at the time (30m, give or take), those 28 oars must have made her very fast.
However, Japanese sculling oars are more complicated in shape than western-style oars, so this project involves cutting and shaping 56 pieces of wood, plus the addition of bindings, handle, and mounting yoke onto each oar. So, I have my work cut-out for me.

Continue reading

Building a Gozabune (Kobaya) from Paris Plans – Part 12

Work on the Kobaya is moving forward again. While coming up with a way to deal with the decorative patterns on the hull has held me up, I did have some ideas. But, the best I could think to do required the use of a new tool, and it took me a while to bight the bullet and buy it.

Note the pattern of the chain of hexagons and what look like little sunbursts in the Paris drawings.

The solution I came up with was to either create a mask for painting or possibly for the application of gold leaf, or to simply cut a pattern that was itself gold leafed. This probably sounds more complicated than it turned out to be. The central part of the solution turned out to be the use of a vinyl cutter, like those used in scrapbooking.
After looking at a few of the leading models, I finally made the leap and bought a Silhouette Cameo 3. I found one for about $200 online and spent another $150 or so on materials and accessories.
The closest competitor to this was the Cricket Maker, but it was more expensive and the drawing software was only usable online, requiring an internet connection to use. Having Internet is not an issue, but requiring it to use my own hardware or even to create drawings was not an idea I like supporting.
I was able to test out Silhouette’s drawing software for the Cameo, which was available as a free download from their website. That allowed me to determine that I would at least be able to create drawings of the things I needed it to cut.

Continue reading

Building a Gozabune (Kobaya) from Paris Plans – Part 11

A yakata for the kobaya?
I’ve been looking at the yakata, or deck cabins, on the paintings of kobaya. Also, there is one from a larger gozabune that was removed and restored and on display at the museum at Kumamoto Castle. I’ve been in touch with ship modeling colleagues in Japan and they told me that it is from a ship called the Naminashi-maru (波奈之丸).

The restored yakata from the Naminashi-maru at the museum of Kumamoto Castle.

I’m still very confused about the dimensions. To me it looks very low, but I’m told the lower level is 1.7 to 2 meters high on the inside. Part of this, I assume is because the floor is below deck level, which is the case on my kobayabune.
To aid in design of the yakata, I’ve fitted a removable cardboard structure. This gives me a sense of size and appearance. I can’t really add the structure without the attendant framework over the whole ship for an awning.
I drew in some outlines for sliding doors and a railing atop the structure. Apparently, the passengers would also sit atop the structure. I’m not sure how they would climb up, but I’m assuming it would be with a “leg up” from one of the attendant samurai on the deck.

Continue reading

Building a Gozabune (Kobaya) from Paris Plans – Part 10

It’s been well over a month since I last posted my progress on the Kobaya-bune. And, while it doesn’t look much different, I did complete the deck planks and gave the hull a couple coats of gloss polyurethane, in an attempt to simulate the lacquer used on the real vessel.

I must have put on thick coats, because the surface has been tacky for a while. It doesn’t help that the weather is a little on the damp and cool side. No matter, I’m not really prepared for the next step, which is to add the decoration, as well as the metal mortise covers, etc.

Continue reading

Building a Gozabune (Kobaya) from Paris Plans – Part 9

A couple weeks ago, I reached a dilemma about the kobaya’s paint scheme. I’m trying to stay as true as I can to the 1868 notes by Armand Paris. He describes the lower hull, hanging beams and rail stanchions as painted in red lacquer. He then describes the interior deck area as being all painted a “blood red”.
This suggests two different shades of red, and there’s only one model I’ve seen that displays two shades. It is a model of the large gozabune Tenchi-maru, which was kept in use right up to the beginning of the Meiji restoration, 1868. From what I can tell, the model was part of the Tokyo Maritime Science Museum. Since the main museum is closed, I don’t know what the status is of this model.
But, since my kobaya also was apparently in use up until the start of the Meiji restoration, it might makes sense that dark red was common for the decks of these state ships, with red and black lacquered exteriors.

Model of the famous gozabune Tenchi-maru. Note the dark red deck areas, with the lighter red color for the hull.

Continue reading

Building a Gozabune (Kobaya) from Paris Plans – Part 8

So, I drilled out the rogui on which the ro, or sculling oars, pivot. I used a sharp point to start the hole and finished up using a small drill in a Dremel rotary tool. Because I’m starting to consider painting the model, I’m going to hold off on adding the pins to the rogui until some later time.

Also, I found more structural work to complete before I have to deal with the rails, so I’m putting that assembly off for the moment.

Finishing Mortises

Today, I finished the remaining mortises. I did these the same way as the ones done earlier, laying out strips of tape to maintain even spacing, but the mortises at the todate (transom) and the miyoshi (stem), were a little smaller and slightly closer together. 

Continue reading

Building a Gozabune (Kobaya) from Paris Plans – Part 7

Mortises

While I’m waiting for the urushi, there is still more work to do on the hull, as well as more design problem solving as well. The main feature needed next are all the mortises. Mostly these are along the bottom edge of the upper hull plank. In addition, for the lower planks, there are mortises at the bow and stern edges. Technically, there would also be mortises at the bow edge of the upper plank and ones all along the bottom edge of the lower plank. But, these apparently do not have metal plates covering them. Most likely, these are plugged and painted over, so you wouldn’t see them anyway.

These mortises measure out to be approximately 5mm long at this scale, with a 4mm separation between them. To help position these evenly, I first lined the edge of the plank with tape, tryng to keep and even alignment about 2mm from the edge of the plank.

I then took some more tape and cut two long strips, one 5mm wide and another 4mm wide. From this I cut short strips crosswise and laid them into place, alternately, to create a pattern for the positions of the mortises. To cut the mortises, I used a 5mm wide Japanese carving chisel and a second chisel that I ground down to a width to 1mm.

Below, you can see some of the mortises I cut and the pattern of tape I used to create the proper spacing. the section on the right has been completed and the tape removed. On the left, I have yet to start cutting.

Continue reading

Building a Gozabune (Kobaya) from Paris Plans – Part 6

The Paint Scheme from Paris

Having made some great progress on the model, it’s time to begin consideration of the paint scheme. From the very start, as a gozabune, it’s been very clear that this is a highly ornate ship, painted in black and vivid red lacquers, and decorated with gold trim.

Model of a large gozabune I found on the Internet.

I’ve noted that modeler Yukio Nakayama’s gozabune models, as well as those made by other Japanese ship modelers, are painted inside and out. Pretty much everything except the decks. This left me wondering how I would end up finishing this model.

I’ve been in a quandary because I do like the look of the interior painted bulwarks and beams with the bare wood deck. But, I recently looked more closely at the notes on the Paris drawings and discovered that interior painting information is actually there in addition to the exterior info.

Another gozabune model found on the Internet.

Continue reading

Building a Gozabune (Kobaya) from Paris Plans – Part 5

The Rudder

One of the sub-assemblies that can easily be worked on at any time is the large rudder. The detail in the drawings is very simple, but I felt that it should be very similar to other large rudders used on larger vessels. With the

I made mine from three planks glued edge to edge and cut to the shape of the plans. I then attached a rudder post that I cut round and then tapered toward the bottom. To hold the planks of the rudder together, I took example from the Woody Joe Higaki Kaisen kit I built a few years ago, and added three cross-pieces as shown in the following photo.

I don’t know what amount of detail to add yet, so I just left the rudder assembly as is. Continue reading